

Hey all!
I am writing this thread from work, so if there is any lack of detail, just ask and I shall clear it up")
Unfortunately, I didn't have my camera in the same city as me when I put the head on the motor, but pics will come tomorrow or the day after ASAP!
On to the more interesting stuff:
I was planning a G23VTEC build, which could still happen, we'll see, for my brother's car, but because he wants to go turbo, and the fact that DSM 1G Manifolds bolt right up to H23 heads, I decided to use go the G23 route.
Parts that I used from H23:
The mechanical part of this swap is pretty straight forward. You can use the head gasket of either the H23, or F23, but with the latter, there is a small part of an oil passage that doesn't quite line up.
The wiring can get pretty hairy! As some of you know from Egi7's build thread, the distributer poses some problems. The F23 distributer doesn't bolt up to the H23 head. You can use either an H23, or H22 head. All you need is the Wiring Diagram for your Accord, and from the car/motor of the dizzy you are using.
With an OBD1 H22 Dizzy, you will need to purchase an external coil, in the likes of an MSD Blaster SS, etc, and wire that up. Also, the OBD1 H22 distributer has the CKP, and another senor within the dizzy housing, unlike the F23, which has these sensors located at the crank shaft, behind the crank pully. It is your choice which sensor to use. You can extend the wires from the crank back to the distributer, or you can use the sensors mounted at the crankshaft. Both will give the SAME signal.
With an OBD2 H22 Dizzy, it doesn't have the sensors built in to it like the OBD1 unit, which means you cannot use it, because the H23 timing gear does not provide the signal, and therefor the sensors mounted at the crank cannot be used.
With the H23 dizzys, I am not entirely sure of their configuration, but given the info I have provided and the similarity of the H22 and H23 engines, I am sure it shouldn't be too hard to figure something out.
I used an F20B distributer, simply because I had one lying around from my motor, which is now using an OBD1 H22 External Coil unit. It is similar to the OBD1 unit, in that the dizzy has the CKP and TDC Sensors built into it. However, I chose to use the sensors mounted at the crank. In essence, I have 4 pins at the distributer which are NOT being used.
I will probably order another OBD1 H22 External Coil unit when I bolt up the turbo to his motor. All in good time
Also, since I am going OBD1, I had to do the 2-wire IACV conversion. It is NOT like the Civic/Integra conversion. Connect the BLU/BLK wire from the engine harness to the BLK wire on the plug, and the YEL/BLK wire from the engine harness to the GRN wire on the plug.
SO, some UPDATES!
Got the car running, was schweet, for about 1.5 hours. Then....3 cylinders. Why? I didn't use the oil jet from the H23. I don't remember reading ANYTHING about it in ANY of the other build threads on Honda-Tech. But anyway...here are the pics I promised AGES ago:
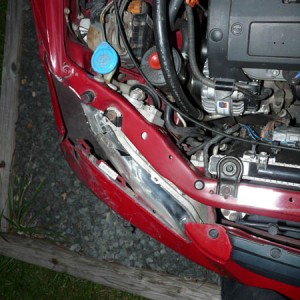
Here is the original head off the car:

Yeah I know the engin bay is filthy, but welcome to Quebec winters. Mind you, most of that "dirt" is actually rust proofing.
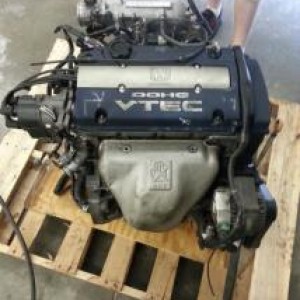
H23 head in its new home...

H23 Timing Belt:

Modded Alternator Bracket...just some grinding. I dunno about doing this by hand, but it took about 10 minutes on a bench grinder.


Nice, sandblasted valve cover, ready to be painted YELLOW!

I am writing this thread from work, so if there is any lack of detail, just ask and I shall clear it up
Unfortunately, I didn't have my camera in the same city as me when I put the head on the motor, but pics will come tomorrow or the day after ASAP!
On to the more interesting stuff:
I was planning a G23VTEC build, which could still happen, we'll see, for my brother's car, but because he wants to go turbo, and the fact that DSM 1G Manifolds bolt right up to H23 heads, I decided to use go the G23 route.
Parts that I used from H23:
- Head
- Intake Manifold
- Down Pipe
- Fuel Rail
- Head Studs
- Valve Cover
- Thermostat Housing
- Timing Belt
- Lower Timing Gear
- P/S Pump and Bracket
- Oil Dip Stick and Dip Stick Guide
- OIL JET FROM BLOCK
- Block
- Head gasket
- Injectors
- Wire Harness
- Water Pump
- Alternator
- Alternator Bracket *Modified*
- F22A6 Water Pipe (behind the block)
- F22 Header
- F20B Distributor
- Chipped P06 ECU
The mechanical part of this swap is pretty straight forward. You can use the head gasket of either the H23, or F23, but with the latter, there is a small part of an oil passage that doesn't quite line up.
The wiring can get pretty hairy! As some of you know from Egi7's build thread, the distributer poses some problems. The F23 distributer doesn't bolt up to the H23 head. You can use either an H23, or H22 head. All you need is the Wiring Diagram for your Accord, and from the car/motor of the dizzy you are using.
With an OBD1 H22 Dizzy, you will need to purchase an external coil, in the likes of an MSD Blaster SS, etc, and wire that up. Also, the OBD1 H22 distributer has the CKP, and another senor within the dizzy housing, unlike the F23, which has these sensors located at the crank shaft, behind the crank pully. It is your choice which sensor to use. You can extend the wires from the crank back to the distributer, or you can use the sensors mounted at the crankshaft. Both will give the SAME signal.
With an OBD2 H22 Dizzy, it doesn't have the sensors built in to it like the OBD1 unit, which means you cannot use it, because the H23 timing gear does not provide the signal, and therefor the sensors mounted at the crank cannot be used.
With the H23 dizzys, I am not entirely sure of their configuration, but given the info I have provided and the similarity of the H22 and H23 engines, I am sure it shouldn't be too hard to figure something out.
I used an F20B distributer, simply because I had one lying around from my motor, which is now using an OBD1 H22 External Coil unit. It is similar to the OBD1 unit, in that the dizzy has the CKP and TDC Sensors built into it. However, I chose to use the sensors mounted at the crank. In essence, I have 4 pins at the distributer which are NOT being used.
I will probably order another OBD1 H22 External Coil unit when I bolt up the turbo to his motor. All in good time
Also, since I am going OBD1, I had to do the 2-wire IACV conversion. It is NOT like the Civic/Integra conversion. Connect the BLU/BLK wire from the engine harness to the BLK wire on the plug, and the YEL/BLK wire from the engine harness to the GRN wire on the plug.
SO, some UPDATES!
Got the car running, was schweet, for about 1.5 hours. Then....3 cylinders. Why? I didn't use the oil jet from the H23. I don't remember reading ANYTHING about it in ANY of the other build threads on Honda-Tech. But anyway...here are the pics I promised AGES ago:
Here is the original head off the car:
Yeah I know the engin bay is filthy, but welcome to Quebec winters. Mind you, most of that "dirt" is actually rust proofing.
H23 head in its new home...
H23 Timing Belt:
Modded Alternator Bracket...just some grinding. I dunno about doing this by hand, but it took about 10 minutes on a bench grinder.
Nice, sandblasted valve cover, ready to be painted YELLOW!
Last edited: