

shavedaccord
Well-Known Member
Ok so you want to smooth out your ride eh? well your in the right place then.
1.Open up the image you wish to smooth. In this case I'm going with my faithful Audi that I used in the "Color Change" tutorial.
2. Zoom in to about 400% (View > Zoom In)
3. Now grab your "Clone Stamp Tool" which is located on the tool bar right above the "Eraser Tool"
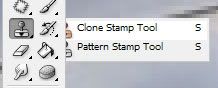
TIP: The "Clone Stamp Tool" can be extremely tricky to use but after a few tries you'll get the hang of it. What the "Clone Stamp Tool" does is esentialy "clone" an area of the image that you choose then "stamps" it onto another location that you also choose. You need to be aware of any highlights, shadows, color changes & lines when useing this tool because they will carry over.
4. Ok so you have your "Clone Stamp Tool" selected and you're zoomed in ready to shave something. First thing you're going to do is select an area to clone you do this by holding down Alt (cursor should change into cross hairs with a circle) and left clicking on your mouse. Once you have the "clone" area selected release the alt button. Now it's time to start "stamping" keep in mind you're stamping the EXACT area you selected as a "clone". Pay very close attention to the crosshairs as you are "stamping" as they tell you exactly what area is being "cloned" also keep an eye on your brush cursor as it tells you exactly what's being "stamped". I know this may sound confusing or hard but it really is not just takes some practice. Ok so once you have got the hang of it and shaved off whatever you may be shaving in my case a door handle you should end up something like this.

TIP: If it doesn't look right when you're done use the "Smudge Tool" or "Blur Tool" to help align shadows, highlights, lines or color changes.
1.Open up the image you wish to smooth. In this case I'm going with my faithful Audi that I used in the "Color Change" tutorial.
2. Zoom in to about 400% (View > Zoom In)
3. Now grab your "Clone Stamp Tool" which is located on the tool bar right above the "Eraser Tool"
TIP: The "Clone Stamp Tool" can be extremely tricky to use but after a few tries you'll get the hang of it. What the "Clone Stamp Tool" does is esentialy "clone" an area of the image that you choose then "stamps" it onto another location that you also choose. You need to be aware of any highlights, shadows, color changes & lines when useing this tool because they will carry over.
4. Ok so you have your "Clone Stamp Tool" selected and you're zoomed in ready to shave something. First thing you're going to do is select an area to clone you do this by holding down Alt (cursor should change into cross hairs with a circle) and left clicking on your mouse. Once you have the "clone" area selected release the alt button. Now it's time to start "stamping" keep in mind you're stamping the EXACT area you selected as a "clone". Pay very close attention to the crosshairs as you are "stamping" as they tell you exactly what area is being "cloned" also keep an eye on your brush cursor as it tells you exactly what's being "stamped". I know this may sound confusing or hard but it really is not just takes some practice. Ok so once you have got the hang of it and shaved off whatever you may be shaving in my case a door handle you should end up something like this.
TIP: If it doesn't look right when you're done use the "Smudge Tool" or "Blur Tool" to help align shadows, highlights, lines or color changes.