Changing brake light function

RedRyder

Save the manuals
Joined
Sep 5, 2008
Posts
19,516
Reaction score
118
Location
Fawking, OH
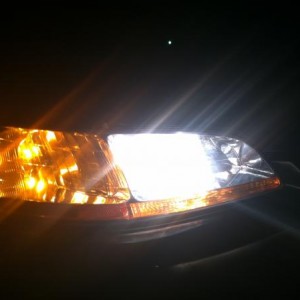
if youre using an led, youll have to solder in a resistor so that you dont get hyper blinking.

but since its made to take the place of a dual filament bulb, yeah, it should work just the same as the bulb would.

I should have the hyper blinking covered since I replaced my flasher unit already.

if all you're trying to do is keep the corner from lighting up during the dim running light mode and only come on during the bright blinking mode, its super easy.

look at the base of the bulb, there are 2 contacts, put a piece of electrical tape over one of them and it'll turn off that particular light, just test to see if the one you have covered is the bright or the dim contact. this way you dont have to cut any wires so you can always revert back to a halogen bulb.

i have the exact same thing done to my tails. my upper corners dont light up at all until i hit the blinkers.

both contacts at the bottom of the bulb are positive one engages the dim mode, one engages the bright mode, the ground is the entire side of the bulb.

Here is the bulb I am using in my tails:
http://www.v-leds.com/Exterior-LED/Brake-Light-LED/Red-LED/2-RED-3157-V-LEDS-7W-p6634413-1-2.html

Since there are four points of contact, are you saying I cover two of the wires on one of the long sides?
 

Accord281

Well-Known Member
Joined
Feb 1, 2009
Posts
533
Reaction score
5
Location
Fargo, ND
The easiest fix for this would be to trade your coupe for a sedan. I just happen to have one here...


:hide:
 

KnightRyder

Well-Known Member
Joined
May 7, 2008
Posts
890
Reaction score
17
Location
Hayward, CA
I should have the hyper blinking covered since I replaced my flasher unit already.


Here is the bulb I am using in my tails:
http://www.v-leds.com/Exterior-LED/Brake-Light-LED/Red-LED/2-RED-3157-V-LEDS-7W-p6634413-1-2.html

Since there are four points of contact, are you saying I cover two of the wires on one of the long sides?


try this... attach 2 wires to your car battery, one + and one - (obviously dont touch them together) then touch those wires to the different leads on that bulb and just test to see which one does what. i think the reason there are 4 is because 2 are grounds, one is the "bright wire" and the other is the "dim wire". you need to cover either wire that is related to the "dim mode". as long as you cover one of the dim wires, the circuit wont be completed and it wont turn on. im gonna go look at my car today and see how i did it. i forgot that it was that style bulb.what i do know is that both grounds are located on one corner of the bulb, just up to you to find out which corner it is.

pm me if you have more trouble, i may not check this thread again.
 
Last edited:

KnightRyder

Well-Known Member
Joined
May 7, 2008
Posts
890
Reaction score
17
Location
Hayward, CA
oh, i found an old picture i drew up for myself when i was working on my tails...

if you pull out the bulb from the corner light while leaving it plugged into the bulb holder... the green wire is your blinker aka bright wire, the red wire is the parking light aka the dim running light which you want to cover and the black is ground. now just look at how the bulb is sitting in there and which side the red wire is on and then pull the bulb out and cover the lead that connects to the red wire.
 

RedRyder

Save the manuals
Joined
Sep 5, 2008
Posts
19,516
Reaction score
118
Location
Fawking, OH
try this... attach 2 wires to your car battery, one + and one - (obviously dont touch them together) then touch those wires to the different leads on that bulb and just test to see which one does what. i think the reason there are 4 is because 2 are grounds, one is the "bright wire" and the other is the "dim wire". you need to cover either wire that is related to the "dim mode". as long as you cover one of the dim wires, the circuit wont be completed and it wont turn on. im gonna go look at my car today and see how i did it. i forgot that it was that style bulb.what i do know is that both grounds are located on one corner of the bulb, just up to you to find out which corner it is.

pm me if you have more trouble, i may not check this thread again.

Thanks man. Let me know if you find any useful information when you check how you did yours. The LED bulbs only work when inserted one way as you know, so I'm sure that has something to do with which one is the dim wire.

So I am looking into KnightRyder's idea. If that doesn't work out, I am going to try what Sketch said and test the wires, then decided whether to cut/alter the pin. I may buy two of these and have them as an extra set should I choose to alter my current harness:

http://tasauto.com/Product/Detail.aspx?s=2834160&d=1188&p=1

I never like altering anything permanently if I can help it.

EDIT:

oh, i found an old picture i drew up for myself when i was working on my tails...

if you pull out the bulb from the corner light while leaving it plugged into the bulb holder... the green wire is your blinker aka bright wire, the red wire is the parking light aka the dim running light which you want to cover and the black is ground. now just look at how the bulb is sitting in there and which side the red wire is on and then pull the bulb out and cover the lead that connects to the red wire.

That is great, thank you for posting that. I am going to give this a go tonight after work. So a small piece of scotch tape would work?
 
Last edited:

KnightRyder

Well-Known Member
Joined
May 7, 2008
Posts
890
Reaction score
17
Location
Hayward, CA
Thanks man. Let me know if you find any useful information when you check how you did yours. The LED bulbs only work when inserted one way as you know, so I'm sure that has something to do with which one is the dim wire.

So I am looking into KnightRyder's idea. If that doesn't work out, I am going to try what Sketch said and test the wires, then decided whether to cut/alter the pin. I may buy two of these and have them as an extra set should I choose to alter my current harness:

http://tasauto.com/Product/Detail.aspx?s=2834160&d=1188&p=1

I never like altering anything permanently if I can help it.

EDIT:


That is great, thank you for posting that. I am going to give this a go tonight after work. So a small piece of scotch tape would work?

in the short run yes, it will work but you want to use electrical tape since thats exactly what it's designed for. but scotch tape might be too weak, i have a feeling that it'll rip or something when you try to reinsert the bulb
 

RedRyder

Save the manuals
Joined
Sep 5, 2008
Posts
19,516
Reaction score
118
Location
Fawking, OH
in the short run yes, it will work but you want to use electrical tape since thats exactly what it's designed for. but scotch tape might be too weak, i have a feeling that it'll rip or something when you try to reinsert the bulb

I don't know what the hell I was thinking when I typed that, I have electrical tape. :dunce:

The easiest fix for this would be to trade your coupe for a sedan. I just happen to have one here...

:hide:

Aw c'mon now! I KNOW you wouldn't do that, I think your car looks great. Maybe a coupe front end conversion would help soothe your angst? :)
 

Stile442

Well-Known Member
Joined
Jul 25, 2009
Posts
217
Reaction score
0
Location
Deland, Fl
If it helps at all. I was intrigued by this and decided to try it. on my car it was the bottom two contact points that needed to be covered with tape.
 

RedRyder

Save the manuals
Joined
Sep 5, 2008
Posts
19,516
Reaction score
118
Location
Fawking, OH
I forgot to update this thread. All I did was cover the lead the red wire went to on the bulb and I got the desired effect. So KnightRyder's suggestion worked great. Thanks everyone for your help!

Love the way the rear looks now with the parking lights on, and I love how the turn signal is now just on or off.
 
Back
Top