
shavedaccord
Well-Known Member
Ok. This tutorial is for basic introduction into animation with Photoshop CS2 and Imageready. This tutorial involves switching from Photoshop CS2 to Imageready. There are other ways of doing this process.
This is a simple "Lights on Lights off" animation that has been seen around on the forum.
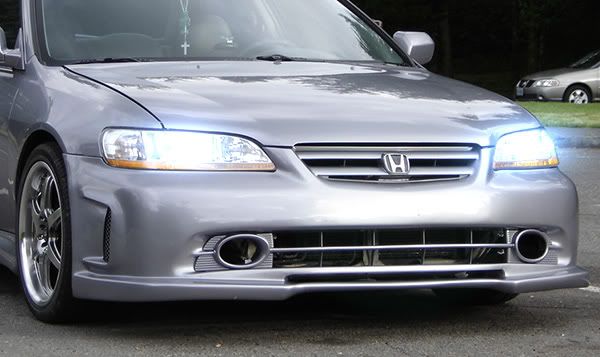
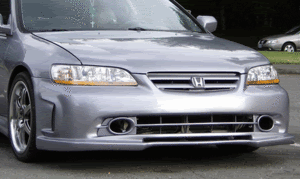
So the images I have chosen to use are of my car with "simulated" lighting (Please check the HID tutorial) since I did not have a picture of my car with the lights on.The process is the exact same if you do have pictures with your cars lights on.
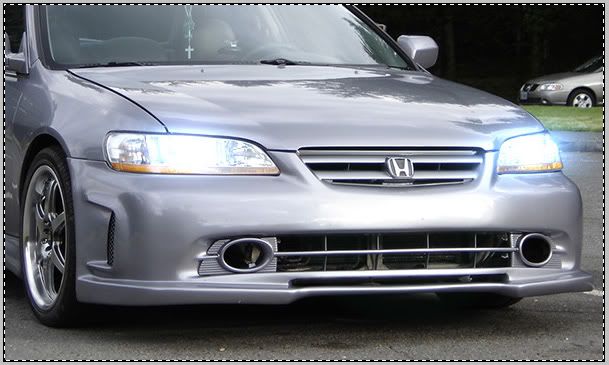
Lights on:
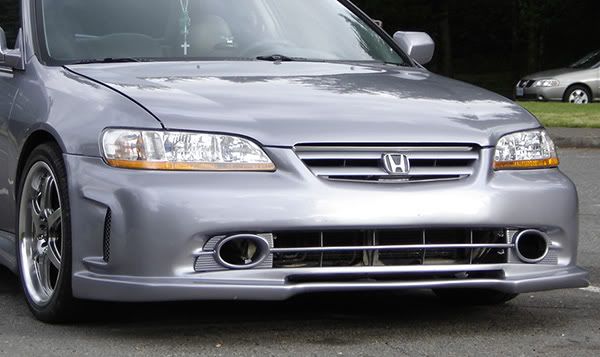
Lights off:
1. Ok. Open up Photoshop and then open both of your images (File > Open). Once both images have opened create a new layer on your "lights off" image
Where to click in order to make a new layer:
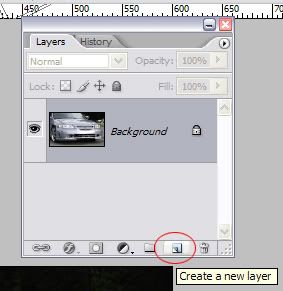
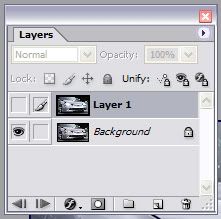
What your layers palette should look like afterwards:

2. Now with that now layer created, minimize your "lights off" image and bring up your "lights on" image. Now go to Select > All (Ctrl+A). Once the image has been selected copy it Edit > Copy (Ctrl+C).
Should look like so once selected:
3. Minimize your "lights on" image (the one you just selected) and bring up your "lights off" image and paste the "lights on" image into it Edit > Paste (Ctrl+V). Your layers should now look like the following.

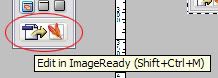
4. Ok now that we have the easy part done it's time to switch to Imageready and get some work done. To switch to Imageready, Photoshop has a very handy tool for this. It is located on the very bottom of your tool bar. It looks like a small document with an arrow pointing to another document with 2 feathers. Check out the image below if you cannot find it. You can also access this tool by pressing Shift+Ctrl+M
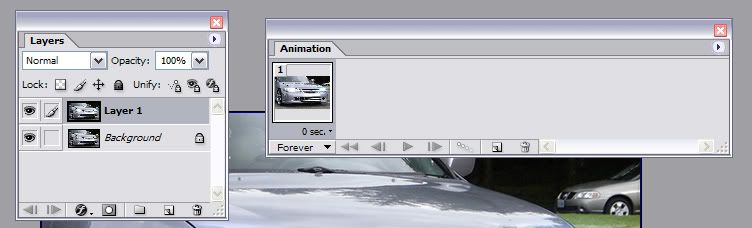
5. Ok so you hit the magical button and image ready starts to open. Once it has fully opened you will notice the image you were just working on along with the layers has automatically imported into Imageready! Now lets get to work.
6. You will be working with two main palettes here in Imageready the "Layers Palette" and the "Animation Palette" if you do not see these palettes when Imageready opens up go to Window and make sure "Animation" & "Layers" have a check by them,
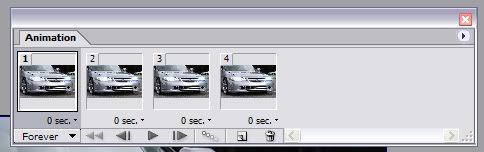
7. Ok first thing is first. On the "animation palette" you will see a little icon allowing you to duplicate the current frame. Go ahead and hit that button 3 times. (you can add as many frames as you wish but I choose to keep it simple and use only 4)
the button:

what your frames should look like afterwards:
8. Ok. Now that you have your 4 frames your probably wondering their all the same how is this going to animate anything? Well it's simple. We want to start with our lights off in this animation so make sure the first frame in selected and go to layers palette on "Layer 1" you will see an eye next to the layer click on that eye so that it "hides" that layer. Layers palette should look like the following now. Also notice that it hide that layer on every frame of your animation. Don't worry it's supposed too.
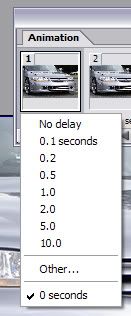
9. Ok no that we have that layer hidden go back to your "Animation Palette" on the first frame you will notice "0 sec." at the bottom click on it. It will bring up a little menu. What this little menu does is gives you the option to select how much delay you want between this frame and the next frame. We're going to go ahead and pick 0.5 (half a second)
10. Ok now that you pick the delay for your first frame go ahead and select the second frame. With the second frame selected go back to your "Layers Palette" and un hide"Layer 1" (click the empty gray box next to the layer the little eye should reappear). Once you have done that you will notice that frame 2 in your "Animation Palette" now has it's lights on. You can go ahead and view your progress now by clicking the little "Play" icon on the "Animation Palette". You'll notice the first frame has a slight delay but the others plays extremely fast giving you a strobe light effect. It's cool but it's not what we're going for.
11. You can also choose to either put a delay on this frame or leave it be. We're going to go ahead and put a 0.5 second delay on this frame also so we don't get a strobe light effect. Now with frame 2 taken care of let's move onto frame 3. Select frame 3 and do the exact same thing you done for frame 2. Go to your "Layers Palette" and un hide Layer 1. Then set your delay to 0.5 seconds.
12. The final frame is pretty simple. The "lights on" layer should already be hidden on this frame. If not just follow the above instructions on how to hide the "lights on" later. if it's already hidden all you really need to do is change the delay on this frame. I choose to go with 0.5 seconds again. Once you have done that it's time to play your animation and see how it looks. Playing the animation is simple you just hit the "Play" button to play it and hit the "Stop" button to stop it. It's like a VCR.
13. So you checked out your animation and you like it. Now it's time to save it. Go to"File > Save Optimized As..." or "Ctrl+Shift+Alt+S". This will bring up a little window. Typical file saving dialog for windows but with a few extra options. All you need to worry about here is the "Save as type:" has "Image Only (*.gif)" selected. Then simple choose where you want to save it and the name you wish it to be saved as and hit "Save". Congrats you have just created your first animation. Here is my result below.

Now remember this is basic animation. No fancy effects or anything here. If you experiment and try different things you may come up with some cool effects and animations. Here is what I came up with below by simply creating more frames and lowering the opacity on the layer in certain frames.
This is a simple "Lights on Lights off" animation that has been seen around on the forum.
So the images I have chosen to use are of my car with "simulated" lighting (Please check the HID tutorial) since I did not have a picture of my car with the lights on.The process is the exact same if you do have pictures with your cars lights on.
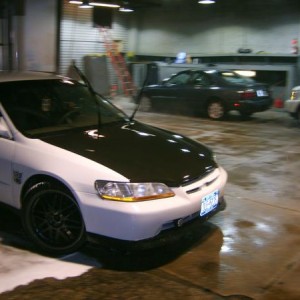
Lights on:
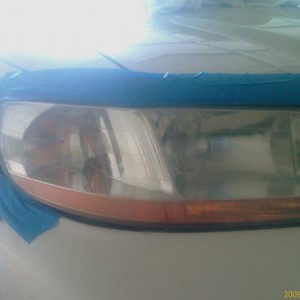
Lights off:
1. Ok. Open up Photoshop and then open both of your images (File > Open). Once both images have opened create a new layer on your "lights off" image
Where to click in order to make a new layer:
What your layers palette should look like afterwards:
2. Now with that now layer created, minimize your "lights off" image and bring up your "lights on" image. Now go to Select > All (Ctrl+A). Once the image has been selected copy it Edit > Copy (Ctrl+C).
Should look like so once selected:
3. Minimize your "lights on" image (the one you just selected) and bring up your "lights off" image and paste the "lights on" image into it Edit > Paste (Ctrl+V). Your layers should now look like the following.
4. Ok now that we have the easy part done it's time to switch to Imageready and get some work done. To switch to Imageready, Photoshop has a very handy tool for this. It is located on the very bottom of your tool bar. It looks like a small document with an arrow pointing to another document with 2 feathers. Check out the image below if you cannot find it. You can also access this tool by pressing Shift+Ctrl+M
5. Ok so you hit the magical button and image ready starts to open. Once it has fully opened you will notice the image you were just working on along with the layers has automatically imported into Imageready! Now lets get to work.
6. You will be working with two main palettes here in Imageready the "Layers Palette" and the "Animation Palette" if you do not see these palettes when Imageready opens up go to Window and make sure "Animation" & "Layers" have a check by them,
7. Ok first thing is first. On the "animation palette" you will see a little icon allowing you to duplicate the current frame. Go ahead and hit that button 3 times. (you can add as many frames as you wish but I choose to keep it simple and use only 4)
the button:
what your frames should look like afterwards:
8. Ok. Now that you have your 4 frames your probably wondering their all the same how is this going to animate anything? Well it's simple. We want to start with our lights off in this animation so make sure the first frame in selected and go to layers palette on "Layer 1" you will see an eye next to the layer click on that eye so that it "hides" that layer. Layers palette should look like the following now. Also notice that it hide that layer on every frame of your animation. Don't worry it's supposed too.
9. Ok no that we have that layer hidden go back to your "Animation Palette" on the first frame you will notice "0 sec." at the bottom click on it. It will bring up a little menu. What this little menu does is gives you the option to select how much delay you want between this frame and the next frame. We're going to go ahead and pick 0.5 (half a second)
10. Ok now that you pick the delay for your first frame go ahead and select the second frame. With the second frame selected go back to your "Layers Palette" and un hide"Layer 1" (click the empty gray box next to the layer the little eye should reappear). Once you have done that you will notice that frame 2 in your "Animation Palette" now has it's lights on. You can go ahead and view your progress now by clicking the little "Play" icon on the "Animation Palette". You'll notice the first frame has a slight delay but the others plays extremely fast giving you a strobe light effect. It's cool but it's not what we're going for.
11. You can also choose to either put a delay on this frame or leave it be. We're going to go ahead and put a 0.5 second delay on this frame also so we don't get a strobe light effect. Now with frame 2 taken care of let's move onto frame 3. Select frame 3 and do the exact same thing you done for frame 2. Go to your "Layers Palette" and un hide Layer 1. Then set your delay to 0.5 seconds.
12. The final frame is pretty simple. The "lights on" layer should already be hidden on this frame. If not just follow the above instructions on how to hide the "lights on" later. if it's already hidden all you really need to do is change the delay on this frame. I choose to go with 0.5 seconds again. Once you have done that it's time to play your animation and see how it looks. Playing the animation is simple you just hit the "Play" button to play it and hit the "Stop" button to stop it. It's like a VCR.
13. So you checked out your animation and you like it. Now it's time to save it. Go to"File > Save Optimized As..." or "Ctrl+Shift+Alt+S". This will bring up a little window. Typical file saving dialog for windows but with a few extra options. All you need to worry about here is the "Save as type:" has "Image Only (*.gif)" selected. Then simple choose where you want to save it and the name you wish it to be saved as and hit "Save". Congrats you have just created your first animation. Here is my result below.
Now remember this is basic animation. No fancy effects or anything here. If you experiment and try different things you may come up with some cool effects and animations. Here is what I came up with below by simply creating more frames and lowering the opacity on the layer in certain frames.