TUTORIAL: Changing Color #2

shavedaccord

Well-Known Member
Joined
Apr 15, 2006
Posts
5,678
Reaction score
19
Location
Gates, OR
Very very simple tutorial and it is probably the simplest way to achieve a color change.

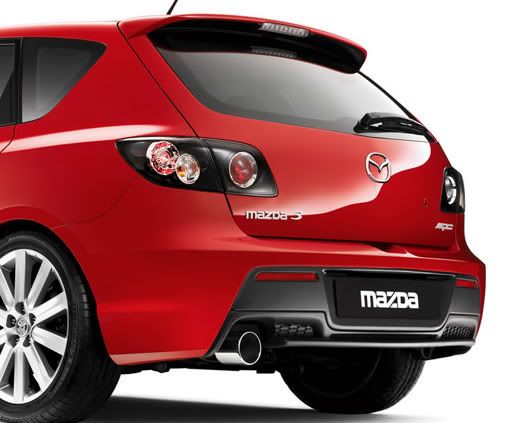
1. Open up photoshop and the auto of your choice to change it's color..I choose a Mazda3 MPS but cropped it down just to show the back half in order to save loading times.
1.jpg


2. Create a copy of the background layer. Make sure you have the background layer selected and goto Layer > New > Layer via copy (Ctrl+J)

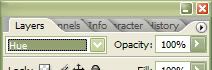
3. Now with the copy layer selected change the layers blending mode to "Hue"
3.jpg


4. Once you have the layers blending mode set to "Hue" goto Image > Adjustments > Hue/Saturation once you have selected Hue/Saturation a little window will pop up make sure you have "Colorize" checked. now just adjust the Hue slider until you find the color of your desire. In my case I just changed it from red to blue. Now grab your eraser tool or however you choose to do so erase any areas that are not susposed to be colored (lights, side markers..etc..)
2.jpg

there you go, pretty simple huh?
 

nf3d0149ab

Well-Known Member
Joined
Aug 24, 2008
Posts
105
Reaction score
0
Location
San Francisco
I appreciate your time & effort putting the tutorials together.

I'm running into an issue.

I tried your Changing Color #1 but didn't have one of the steps in my version of Photoshop.

So...I moved on to Changing Color #2 and see I am experiencing another issue.

I followed all these steps but it will not change my car's silve paint color...only the background.

Here is an example of what I am ref. to.

Original Version

REGCLBACK01.jpg


Adjusted Version w/ Hue & Saturation

REDCLBACK01.jpg


Can you please shed some light on what I might be doing wrong or does this just not work on silver cars?
 

arise257

Well-Known Member
Joined
Jul 15, 2009
Posts
137
Reaction score
1
Location
Washington DC
I appreciate your time & effort putting the tutorials together.

I'm running into an issue.

I tried your Changing Color #1 but didn't have one of the steps in my version of Photoshop.

So...I moved on to Changing Color #2 and see I am experiencing another issue.

I followed all these steps but it will not change my car's silve paint color...only the background.

Here is an example of what I am ref. to.

Original Version

REGCLBACK01.jpg


Adjusted Version w/ Hue & Saturation

REDCLBACK01.jpg


Can you please shed some light on what I might be doing wrong or does this just not work on silver cars?

The original tutorial is missing a step! You need to isolate the car from the background when you do this sort of work. He was lucky because his background was white and thus hue changes have no effect.

  1. Open your document.
  2. Hit Ctrl+J, or go to Layer-> Duplicate Layer.
  3. On your new layer, use the pen tool to draw a path around your car. If you see this path filling with color, you are drawing a shape. Look at the top of the screen and make sure the button with the bounding box containing a pen icon is selected. Be sure to close the path.
  4. Right click the path and select "Create Vector Mask". Your car is now isolated from the background.
  5. At the bottom of the Layers palette there is a row of buttons. Click the 4th one over, it looks like a circle split black and white at an angle (Create New Adjustment Layer). Select Hue and Saturation.
  6. Check "Colorize" and then start working the sliders to your satisfaction. You'll notice that despite all our work the background is still switching colors!!! Don't panic. Finish up and hit OK.
  7. In your layers palette, there should be three layers (bottom to top): your original layer, your car layer with a vector mask, and the new adjustment layer. Hold down Alt, place your mouse on the line between your adjustment layer and car layer, and click. The adjustment layer will indent and have a little arrow pointing down to the car layer. This is to indicate that the adjustment layer will only affect the car layer directly beneath it. Your background should have swapped back to normal.

The advantage to doing it this way is that this adjustment layer is completely re-adjustable. It's just sitting on top of your car layer. If you hide the adjustment layer, your car goes back to normal. The more advanced Photoshopper can continue linking adjustment layers together. If this were my project, I would adjust the levels on the car to be a bit more crisp then the background.

Moreover, the car is not linked to the background, which means you can edit the background independently. Now you can pull a nice gaussian blur on the background with confidence, knowing you won't accidentally blur the edges of your car. Hell, you could even change the color of the background, or scrap it entirely. This gives you an opportunity to explore some truly creative options! A few extra steps can help you move the car into Illustrator or InDesign...:Smoker:
 

arise257

Well-Known Member
Joined
Jul 15, 2009
Posts
137
Reaction score
1
Location
Washington DC
A SPECIAL NOTE ABOUT NEUTRAL COLOR CARS:

Both techniques presented here work best on cars with primary, secondary, or tertiary colors. Neutrals usually don't have enough saturation to apply a hue shift to. Neutral colors are Black, Grey, Silver, and White, essentially all shades of grey.

Grey and Silver cars are the easiest to deal with, White and Black cars are extremely difficult. For those with neutral colors, after you create the new Hue/Saturation adjustment layer and the window pops up:
  1. Check off colorize and pull the saturation all the way back. Click OK.
  2. In your layers palette, there should be three layers (bottom to top): your original layer, your car layer with a vector mask, and the new adjustment layer. Hold down Alt, place your mouse on the line between your adjustment layer and car layer, and click. The adjustment layer will indent and have a little arrow pointing down to the car layer. This is to indicate that the adjustment layer will only affect the car layer directly beneath it. Your background should have swapped back to normal.
  3. Create a new adjustment layer on top of the other, but choose "Selective Color" this time.
  4. Switch to the Neutrals sliders and move these around till you get the basic color you're looking for. Fine tune the white sliders, followed by the blacks, then by any other colors. You may have to switch back and forth between this and the Hue/Saturation layer to get it perfect. Have patience, this takes some finesse to get right.
At this point, you should have the paint looking good but now you'll notice some other glaring problems with the image. First of all, any of the background showing through your windows is now tinted. If you have neutral colored wheels (chrome, silver, black, white) or parts, they will now be tinted. Your headlights and tail lights will probably also be tinted.:squintrun:

It's ok, the fix for this actually very simple:
  1. Click on your car layer with the vector mask.
  2. Choose the Path Selection tool (it's a black arrow without the compass icon).
  3. Click the path of your car.
  4. Select the Ellipse tool. Up at the top of the window, make sure the path is set to Subtract.
  5. Draw ellipses over your wheels. They should snap back to normal.

You can apply the same procedure to your head/tail lights, windows, etc. by using the pen tool. They're irregular shapes so be a little more careful.
 
Back
Top