

jdmgear
Well-Known Member
- Joined
- Sep 8, 2005
- Posts
- 258
- Reaction score
- 0
I decided to post some pictures of my TSX/Accord Headlight Retro. Please keep in mind that if you have any questions I might not respond for a few days. So please be patient  . The headlights I used were OEM stanley which in most cases should matter. I guess I'm the type of guy that likes the name brand/OEM equipment.
The TSX projectors I used were matching lenses and bowls. As you can see below in the cutoff/color pictures I also did a washer mod which gave more color in this area. The Shrouds I used were the Audi A4. I am still in the process of finishing this retro. I will post more pictures as I progress.
Test Fitting the TSX Projector

Test Fitting the A4 Shroud on the reflector housing

Front View of the Reflector Housing cut

Back of housing (uncut) with projector


This picture shows how the TSX projector looks if it were mounted from the front. As you can see the bolts would need to go through the projector housing, which I wanted to avoid since the Audi A4 shroud would not cover these up.

Rear view of the projector on the back of the housing

Test fitting a custom braket before its cut.


This is what the projector and the bracket would look like from the back. As you can see even If I mounted the projector on the back housing it would still need to go through the reflector which I wanted to avoid. Hence the custom bracket.

Custom bracket cut and holes for the projector drilled.

TSX Projector in housing with no shroud

Test fitting A4 Shroud with the top of the reflector cut.

TSX cutoff with no washer mod

TSX cutoff with no washer mod

TSX color with washer mod


Taped off the corner reflector and off to paint

Finished reflector Housing

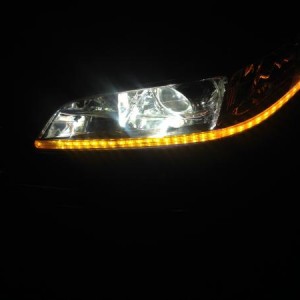
Finshed Front headlight

Side angle of Headlight

. The headlights I used were OEM stanley which in most cases should matter. I guess I'm the type of guy that likes the name brand/OEM equipment. The TSX projectors I used were matching lenses and bowls. As you can see below in the cutoff/color pictures I also did a washer mod which gave more color in this area. The Shrouds I used were the Audi A4. I am still in the process of finishing this retro. I will post more pictures as I progress.
Test Fitting the TSX Projector
Test Fitting the A4 Shroud on the reflector housing
Front View of the Reflector Housing cut
Back of housing (uncut) with projector
This picture shows how the TSX projector looks if it were mounted from the front. As you can see the bolts would need to go through the projector housing, which I wanted to avoid since the Audi A4 shroud would not cover these up.
Rear view of the projector on the back of the housing
Test fitting a custom braket before its cut.
This is what the projector and the bracket would look like from the back. As you can see even If I mounted the projector on the back housing it would still need to go through the reflector which I wanted to avoid. Hence the custom bracket.
Custom bracket cut and holes for the projector drilled.
TSX Projector in housing with no shroud
Test fitting A4 Shroud with the top of the reflector cut.
TSX cutoff with no washer mod
TSX cutoff with no washer mod
TSX color with washer mod
Taped off the corner reflector and off to paint
Finished reflector Housing
Finshed Front headlight
Side angle of Headlight
Last edited: