thejameshimself
Well-Known Member
i got tired of the green tint on my clock, so i decided to do something about it.
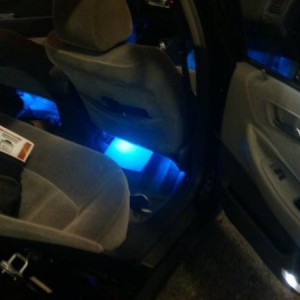
here's a before/after shot from my crappy camera phone


you'll need a soldering iron, flat & phillips head screwdriver, scissors, a load resistor (mine was 470ohm), and an led
ratshack only had one type of white LED (pn 276-320) in stock so that's what i used (if/when i replace it i'll try to update this). it was 5mm, 3.6 volts, 20ma. if you plan on using a different led, brush up on your electronics and give this site a visit: led calculator(the power supply is going to be 12 volts, obviously)
[Part 1 - bulb replacement]
1) remove the clock - cover a flat head with a rag and pry just underneath the clock. unplug the cables in the back of the clock and hazard button.
2) take the white cover off the back of the clock by pulling on the four tabs. you'll be left with the back side of the circuit board

3) the old clock light has tabs on the side that keep it in place. rotate it with a flat head screwdriver they're lined up with the holes and take it out
4) put your led in place of the bulb. (i was able to shove my 5mm led snug into the hole where the bulb was. if you use something smaller you'll probably need some epoxy to hold it in place)
5) there will be two half-circle contacts on either side of where you installed it. towards the top of the clock is positive (+) and towards the bottom is ground.
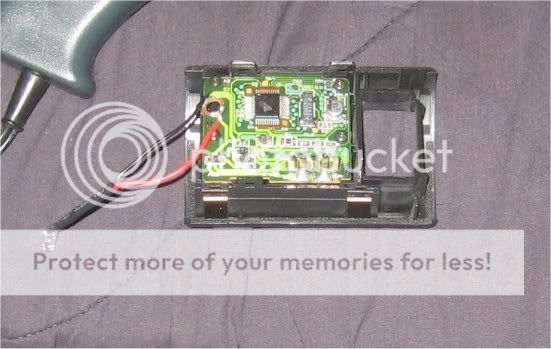
you are going to want to solder one side of your load resistor to the top contact, then solder the other side to the (+) wire of the LED (the longer of the two leads coming out of the LED) then solder the shorter leg to the bottom side of the contact.
here's a diagram i did in good ol' paint and a blurry picture:


also remember to leave room for where the cover on the back goes.
6) if all you wanted to do was change the light, reverse the first two steps and you're done
[Part 2 - diffuser mod]
1) Follow the first two steps above, then remove the four screws on the circuit board

2) Keep the clock face down and remove the board. underneath where it was there will be a big piece of plastic with a 'c' on one end. remove this and you should see the blue-ish diffuser. keep track of the way everything was facing and oriented.

3) I made my new diffuser out of paper using the old one as a stencil.

4) cut the blue part off of the old diffuser so the black border just remains. reinstall the border and your new diffuser into the clock assembly. (the border is to help prevent wobbling)

5) put everything else back in the way it was before, then reverse step one.
Notes:
*) If you opt to keep the stock bulb and just use the paper diffuser the bulb glows an amber color (looks 90s)
*) dimmer knob doesn't work on this as well as the rest of the lights
*) If you drive without your hazard button in your turn signals won't work
*) radioshack employees are little to no help
*) it's not very bright, i'll upgrade in the future
here's a before/after shot from my crappy camera phone
you'll need a soldering iron, flat & phillips head screwdriver, scissors, a load resistor (mine was 470ohm), and an led
ratshack only had one type of white LED (pn 276-320) in stock so that's what i used (if/when i replace it i'll try to update this). it was 5mm, 3.6 volts, 20ma. if you plan on using a different led, brush up on your electronics and give this site a visit: led calculator(the power supply is going to be 12 volts, obviously)
[Part 1 - bulb replacement]
1) remove the clock - cover a flat head with a rag and pry just underneath the clock. unplug the cables in the back of the clock and hazard button.
2) take the white cover off the back of the clock by pulling on the four tabs. you'll be left with the back side of the circuit board
3) the old clock light has tabs on the side that keep it in place. rotate it with a flat head screwdriver they're lined up with the holes and take it out
4) put your led in place of the bulb. (i was able to shove my 5mm led snug into the hole where the bulb was. if you use something smaller you'll probably need some epoxy to hold it in place)
5) there will be two half-circle contacts on either side of where you installed it. towards the top of the clock is positive (+) and towards the bottom is ground.
you are going to want to solder one side of your load resistor to the top contact, then solder the other side to the (+) wire of the LED (the longer of the two leads coming out of the LED) then solder the shorter leg to the bottom side of the contact.
here's a diagram i did in good ol' paint and a blurry picture:
also remember to leave room for where the cover on the back goes.
6) if all you wanted to do was change the light, reverse the first two steps and you're done
[Part 2 - diffuser mod]
1) Follow the first two steps above, then remove the four screws on the circuit board
2) Keep the clock face down and remove the board. underneath where it was there will be a big piece of plastic with a 'c' on one end. remove this and you should see the blue-ish diffuser. keep track of the way everything was facing and oriented.
3) I made my new diffuser out of paper using the old one as a stencil.
4) cut the blue part off of the old diffuser so the black border just remains. reinstall the border and your new diffuser into the clock assembly. (the border is to help prevent wobbling)
5) put everything else back in the way it was before, then reverse step one.
Notes:
*) If you opt to keep the stock bulb and just use the paper diffuser the bulb glows an amber color (looks 90s)
*) dimmer knob doesn't work on this as well as the rest of the lights
*) If you drive without your hazard button in your turn signals won't work
*) radioshack employees are little to no help
*) it's not very bright, i'll upgrade in the future