F23A1AT
Well-Known Member
This is the process for replacing the ignition switch in our cars. This switch will fail, it is a matter of when not if. Some will flame and say take it to the dealer, but for some the switch will fail twice or more times, the stealership will not fix it twice + for free. Symptoms of the failure of the said part will include the vehicle shutting down at random. While cruising the driver may notice the engine stalling, all gauges will read ZERO and the HVAC blower will also cease to work. The problem can be temporarily alleviated by carefully nudging the key while still in stage II toward stage III but not engaging the starter. As this may not solve the issue you are having with your car I am not responsible if this is not the problem, it is one of many solutions to solving the said symptoms, also the cheapest I have found. If this does not remedy the problem look for the Main relay DIY thread.
Disclaimer: I am not you and you are not me, if you break something or muck something up while doing this, ABSOLUTELY NO POINTING FINGERS.
Also if you have a stock radio and have any trim level including and above "EX" this includes V6s you will need the radio code or the radio will cease to function until the code is put back in. You can probably get it for free at your local stealership.
Time required: About 30-45 minutes if you do it right
Difficulty: 2 out of 10
Required stuff:
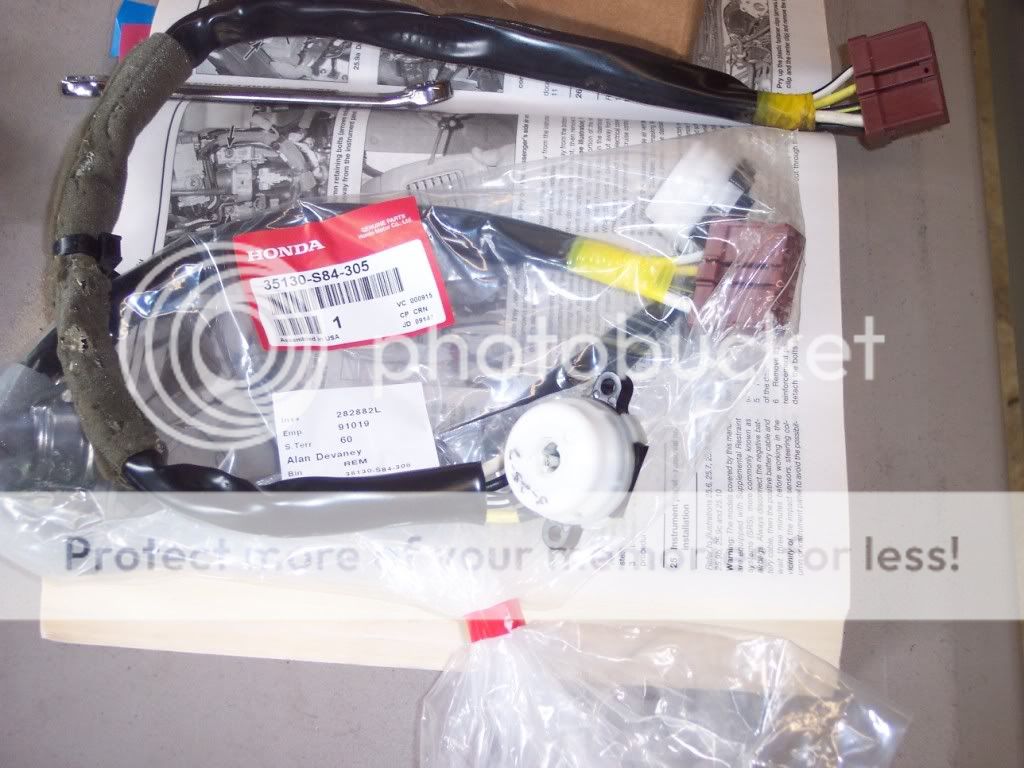
The ignition switch P/N 35130-S84-305 or Click this I'll play nice. This part is for a 98-02 Honda Accord ONLY (for other viewers non-6GA)
A Phillips headed screw driver
A Flat headed screw driver
Patience
About 30-45 mins
NEW parts!!!
Step One: Disconnect your battery, your going to be working in the vicinity of impact sensors so you could set off the airbag if you don't disconnect the battery it could go off. Let the system discharge for about 10 minutes.
Step Two: Remove the fuse panel cover on the drivers side. Then remove the interior trim underneath the center console, it is only held on by clips so if you pull it will come off. This is where you need a flat screw driver carefully pull that panel back so you don't scratch the trim. Then pull on it, the piece is stubborn but it does come out.
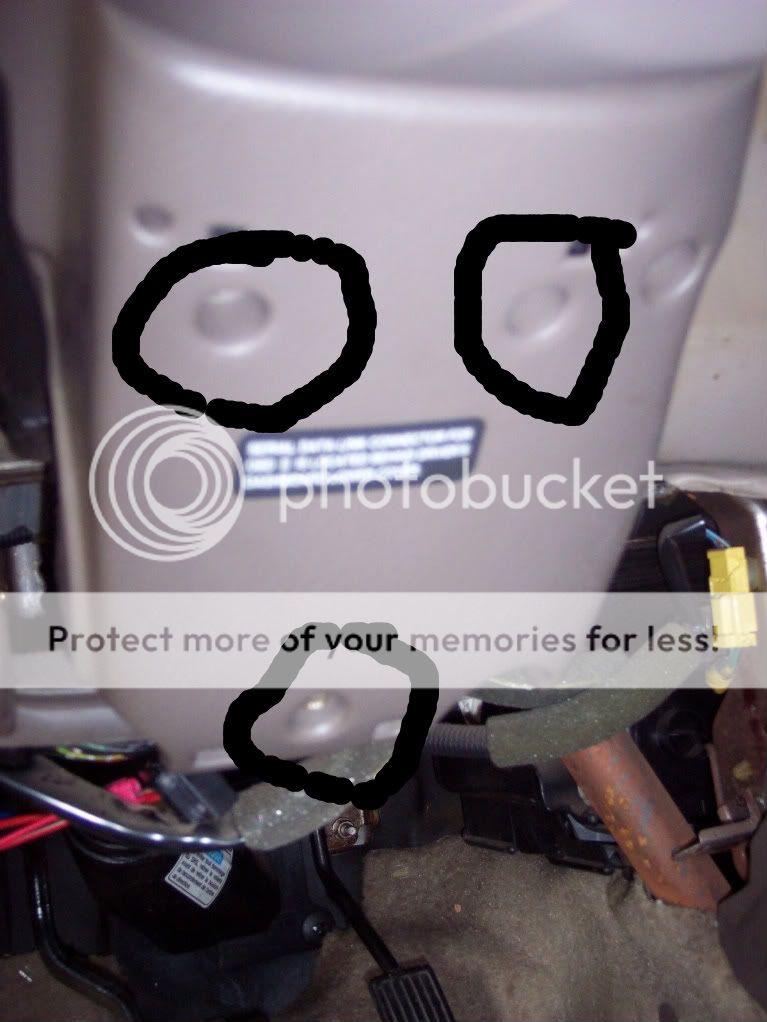
Step Three: Take the Phillips screw driver and remove the three screws holding the knee bolster on there are two behind the fuse panel cover and one behind the stubborn panel under the radio. Here is a pic of the two screws. Then remove the knee bolster it is held on by three clips one on the inboard side of the steering wheel and two nearest to the door. Set this aside. The passenger seat works good for this there usually isn't anything that could scratch it up
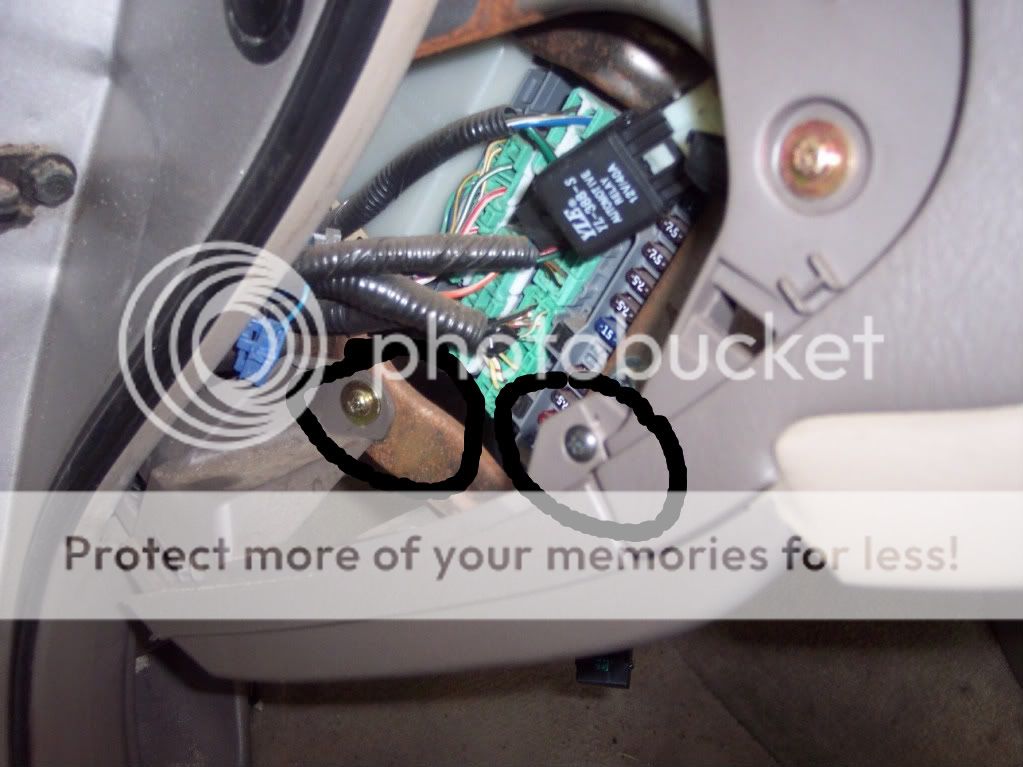 Here is where the other screw is
Step Four: Find the three screws holding the steering column cover on. they are on the bottom of the cover they are Phillips. pixor
Step Five: Separate the two pieces of the column cover (they snap together) the will snap apart easily. To get the cover off you will need to lower the steering wheel and leave the adjusting lever down so that you can slip the bottom piece off, otherwise it will be a PITA to get off.
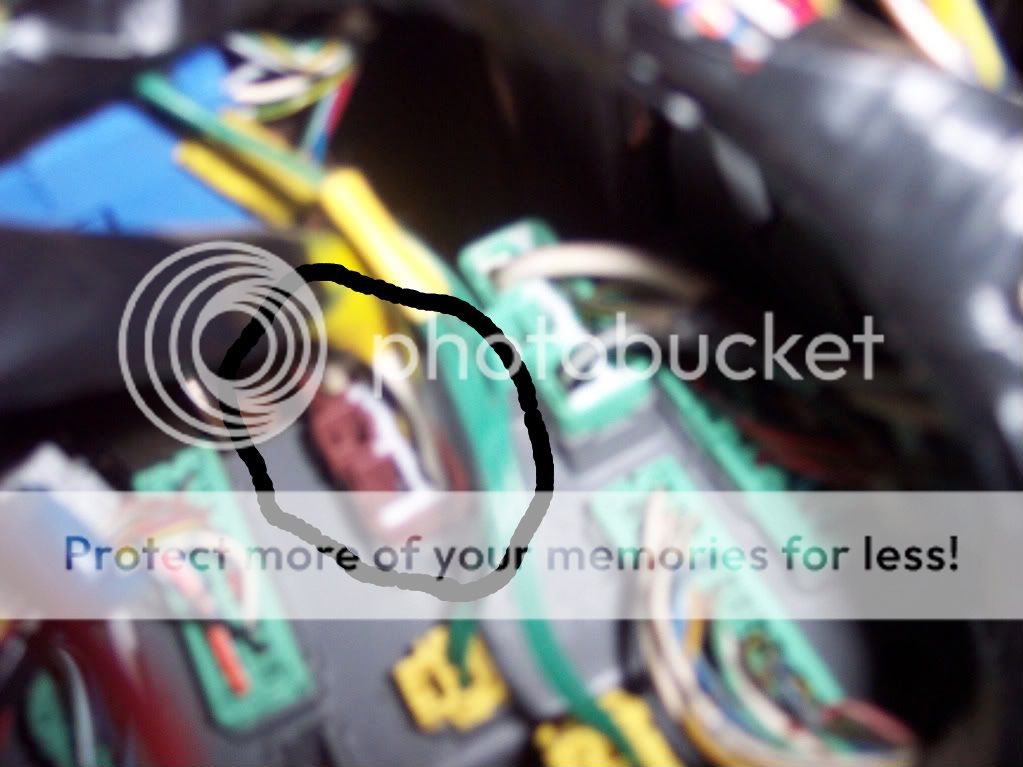
Step Six: Unhook the wiring harness for the ignition switch it is a red clip with a white strip of plastic on it. It is plugged into the back of the fuse panel. This is what it looks like.
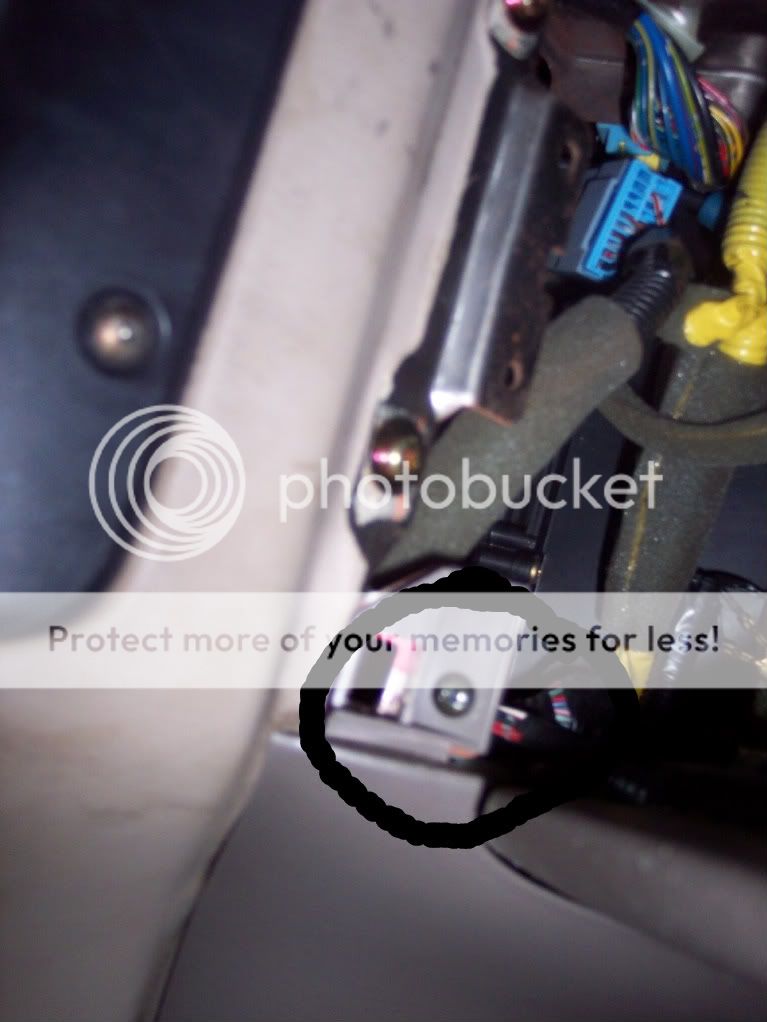
Step Seven: Unscrew the two Phillips screws holding the ignition switch on. One on the top the other on the bottom. There WAS some black piece of plastic in the way. I assume it was some sort of shield but it was in my way and I couldn't unscrew it so it is in about eight little pieces now.

This is one of the two screw holes the other is on the other side of that little set of wires in the black cover
Step Eight: Take off the switch, it is just sitting on the end of a "keyed" shaft so it will not fight to come off.
Step Nine: Route the wiring harness through the little space it calls home and back around to the fuse panel, Be careful not to rip anything out of place or you will have problems.
Step Ten: Reinstall the new ignition switch via the two screws, I don't know why this happened but you may have to turn the center part the part that engages the shaft to the "OFF" position. Mine was turned to a different location, just hold it in the proper orientation and use a flat screw driver to carefully turn it to the off position.
Step Eleven: Plug in the ignition switch harness, then reattach the battery and turn the key to the on (stage 1 or 2) to ensure everything works before you put the interior trim back on.
If it works congratulations have a beer or soda if you prefer (I dunno why you would prefer the latter over the first)
Step Twelve: Put all of the trim back on starting with the column cover. This was the most time consuming of my work, the bottom piece didn't really line up properly for me so it took a while. After you get the three screws in snap the top piece back on. Then move to the knee bolster, push it on then put the three screws back in. Then put the piece of trim back in under the center console, then the fuse panel cover.
And just like every good mechanic knows there will be left over pieces

No I'm just kidding these were pieces that came with the part from Honda I don't know where they go and I didn't take any thing like them off so these are now garbage.
You are now finished with the replacement of the Ignition switch in you 6GA, and it will hopefully not happen again in the life of this car for you at least.
Disclaimer: I am not you and you are not me, if you break something or muck something up while doing this, ABSOLUTELY NO POINTING FINGERS.
Also if you have a stock radio and have any trim level including and above "EX" this includes V6s you will need the radio code or the radio will cease to function until the code is put back in. You can probably get it for free at your local stealership.
Time required: About 30-45 minutes if you do it right
Difficulty: 2 out of 10
Required stuff:
The ignition switch P/N 35130-S84-305 or Click this I'll play nice. This part is for a 98-02 Honda Accord ONLY (for other viewers non-6GA)
A Phillips headed screw driver
A Flat headed screw driver
Patience
About 30-45 mins
NEW parts!!!
Step One: Disconnect your battery, your going to be working in the vicinity of impact sensors so you could set off the airbag if you don't disconnect the battery it could go off. Let the system discharge for about 10 minutes.
Step Two: Remove the fuse panel cover on the drivers side. Then remove the interior trim underneath the center console, it is only held on by clips so if you pull it will come off. This is where you need a flat screw driver carefully pull that panel back so you don't scratch the trim. Then pull on it, the piece is stubborn but it does come out.
Step Three: Take the Phillips screw driver and remove the three screws holding the knee bolster on there are two behind the fuse panel cover and one behind the stubborn panel under the radio. Here is a pic of the two screws. Then remove the knee bolster it is held on by three clips one on the inboard side of the steering wheel and two nearest to the door. Set this aside. The passenger seat works good for this there usually isn't anything that could scratch it up
Step Four: Find the three screws holding the steering column cover on. they are on the bottom of the cover they are Phillips. pixor
Step Five: Separate the two pieces of the column cover (they snap together) the will snap apart easily. To get the cover off you will need to lower the steering wheel and leave the adjusting lever down so that you can slip the bottom piece off, otherwise it will be a PITA to get off.
Step Six: Unhook the wiring harness for the ignition switch it is a red clip with a white strip of plastic on it. It is plugged into the back of the fuse panel. This is what it looks like.
Step Seven: Unscrew the two Phillips screws holding the ignition switch on. One on the top the other on the bottom. There WAS some black piece of plastic in the way. I assume it was some sort of shield but it was in my way and I couldn't unscrew it so it is in about eight little pieces now.
This is one of the two screw holes the other is on the other side of that little set of wires in the black cover
Step Eight: Take off the switch, it is just sitting on the end of a "keyed" shaft so it will not fight to come off.
Step Nine: Route the wiring harness through the little space it calls home and back around to the fuse panel, Be careful not to rip anything out of place or you will have problems.
Step Ten: Reinstall the new ignition switch via the two screws, I don't know why this happened but you may have to turn the center part the part that engages the shaft to the "OFF" position. Mine was turned to a different location, just hold it in the proper orientation and use a flat screw driver to carefully turn it to the off position.
Step Eleven: Plug in the ignition switch harness, then reattach the battery and turn the key to the on (stage 1 or 2) to ensure everything works before you put the interior trim back on.
If it works congratulations have a beer or soda if you prefer (I dunno why you would prefer the latter over the first)
Step Twelve: Put all of the trim back on starting with the column cover. This was the most time consuming of my work, the bottom piece didn't really line up properly for me so it took a while. After you get the three screws in snap the top piece back on. Then move to the knee bolster, push it on then put the three screws back in. Then put the piece of trim back in under the center console, then the fuse panel cover.
And just like every good mechanic knows there will be left over pieces
No I'm just kidding these were pieces that came with the part from Honda I don't know where they go and I didn't take any thing like them off so these are now garbage.
You are now finished with the replacement of the Ignition switch in you 6GA, and it will hopefully not happen again in the life of this car for you at least.
Last edited:


 got mine replaced for free.