

JMillerUA6
Grillin' rape steaks
I know we already have a similar thread to this, but people were asking, and mine is a tad diffrent.
I don't have that many pics so I'll try to be as detailed as possible in explaining.
1) I didn't have a template for my lights so I had to make my own. I used a piece of heavy cardboard and an exacto knife to do this.
When you measure the light obviously you need to do width and height. But the width that you want to measure is from clip to clip on the back of the lens, and the height will be from the bottom to the top of the bulb housing on the back of the lens.
You want the light to fit into your cardboard template just like it would fit into your fender. It should be snug.
2) Using your card board template your going to want to position it exactly where you want your light to go. If I remember correctly I measued 3/4" down from the body line in the fender and 1 1/10" from the leading edge of the driverside door to the back of the light.

This is a picture of the masking tape template that I made, described below.
I used a Sharpie marker to mark the inside of the template where I would be cutting.
3) Step three is the hardest part. First you need to grab your balls to make sure you have them. Then muster up the strength of ten men. Because you are about to cut holes in your car.
4) I would strongly advise wearing saftey glasses while doing this, I got hit in the face and neck by four cut-off wheels doing this.
TIME TO CUT!!!! I recomened a Dremel. DO NOT TRY THIS WITH METAL CUTTERS OR TIN SNIPS!! Use a Rotary tool or the "Metal Nibbler" that is allegedly from Radio Shack (the guys at my local store never heard of it). Set your rotary tool at a low speed, take a deept breath, and very slowly start cutting.
The hole you cut is going to be too small, so keep shaving a little at a time until the light fits SNUGLY in the hole.
Congrats.....the hard part is over.
5) If you have a roll of 3/4" masking tape it will make your life a lot easier. Place a peice of tape any length over the hole, but make sure that the top of the first piece of tape is right up against the top of the hole. Then place another piece of tape right up against the bottom of the hole over-lapping the other piece of tape. Then use your exacto knife to cut the tape on each side of the hole.
You now have a template the exact size of the next hole you need to cut.
Make your measurements on the other fender to make sure it is in the exact same spot as the first hole and stick that mother****er to your fender.
6) Cut the last hole the exact size of your template. If you do this right the light should go right in with no further adjustments.
7) Use a little touch-up paint to cover the bare metal.
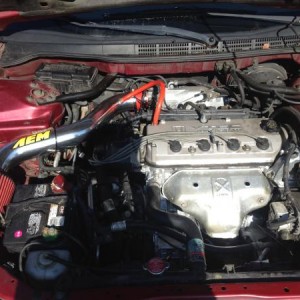
8) Run your wire. Remember you need to run two wires for each light. I used a wire coathanger to pull the wires through. Stick one end in the side marker hole, pull down your wheel-well liner and rout the hanger to the hole in the engine bay where your corner bulbs go in your headlights.
Then tie the two wires to the end to the the hanger sticking out of the side marker hole and pull them through the fender. Do this to both sides.
9) Decide how you want to wire these suckers up. You have two options:
1) On with headlights and parking lights AND blink when turnsignal is on.
or
2) Blink only
I chose to have my lights blink with the turn signal AND stay on with the parking lights and headlights.
First your going to connect the wires to your side markers and install them in the fenders. (I chose to install them backwards apparently) Thanks JDMDynasty!!
Next locate the three wires going into your corner light. There will be two colored wires and one black wire. Cut back the insulation on both colored wires and check your connections. Turn your parking lights on and see wich combination lights up your markers.
When it lights up, hit your blinker to make sure it works (and it should).
Once you have your connections correct tape everything up good and your done!!
Now, go in the house and grab a beer and a Xanax to relieve the anxiety you've just caused yourself.

Any questions, PM me.
I don't have that many pics so I'll try to be as detailed as possible in explaining.
1) I didn't have a template for my lights so I had to make my own. I used a piece of heavy cardboard and an exacto knife to do this.
When you measure the light obviously you need to do width and height. But the width that you want to measure is from clip to clip on the back of the lens, and the height will be from the bottom to the top of the bulb housing on the back of the lens.
You want the light to fit into your cardboard template just like it would fit into your fender. It should be snug.
2) Using your card board template your going to want to position it exactly where you want your light to go. If I remember correctly I measued 3/4" down from the body line in the fender and 1 1/10" from the leading edge of the driverside door to the back of the light.
This is a picture of the masking tape template that I made, described below.
I used a Sharpie marker to mark the inside of the template where I would be cutting.
3) Step three is the hardest part. First you need to grab your balls to make sure you have them. Then muster up the strength of ten men. Because you are about to cut holes in your car.
4) I would strongly advise wearing saftey glasses while doing this, I got hit in the face and neck by four cut-off wheels doing this.
TIME TO CUT!!!! I recomened a Dremel. DO NOT TRY THIS WITH METAL CUTTERS OR TIN SNIPS!! Use a Rotary tool or the "Metal Nibbler" that is allegedly from Radio Shack (the guys at my local store never heard of it). Set your rotary tool at a low speed, take a deept breath, and very slowly start cutting.
The hole you cut is going to be too small, so keep shaving a little at a time until the light fits SNUGLY in the hole.
Congrats.....the hard part is over.
5) If you have a roll of 3/4" masking tape it will make your life a lot easier. Place a peice of tape any length over the hole, but make sure that the top of the first piece of tape is right up against the top of the hole. Then place another piece of tape right up against the bottom of the hole over-lapping the other piece of tape. Then use your exacto knife to cut the tape on each side of the hole.
You now have a template the exact size of the next hole you need to cut.
Make your measurements on the other fender to make sure it is in the exact same spot as the first hole and stick that mother****er to your fender.
6) Cut the last hole the exact size of your template. If you do this right the light should go right in with no further adjustments.
7) Use a little touch-up paint to cover the bare metal.
8) Run your wire. Remember you need to run two wires for each light. I used a wire coathanger to pull the wires through. Stick one end in the side marker hole, pull down your wheel-well liner and rout the hanger to the hole in the engine bay where your corner bulbs go in your headlights.
Then tie the two wires to the end to the the hanger sticking out of the side marker hole and pull them through the fender. Do this to both sides.
9) Decide how you want to wire these suckers up. You have two options:
1) On with headlights and parking lights AND blink when turnsignal is on.
or
2) Blink only
I chose to have my lights blink with the turn signal AND stay on with the parking lights and headlights.
First your going to connect the wires to your side markers and install them in the fenders. (I chose to install them backwards apparently) Thanks JDMDynasty!!
Next locate the three wires going into your corner light. There will be two colored wires and one black wire. Cut back the insulation on both colored wires and check your connections. Turn your parking lights on and see wich combination lights up your markers.
When it lights up, hit your blinker to make sure it works (and it should).
Once you have your connections correct tape everything up good and your done!!
Now, go in the house and grab a beer and a Xanax to relieve the anxiety you've just caused yourself.
Any questions, PM me.
Last edited: