

LowerMyCG5
Well-Known Member
Common problem after opening up our headlights and putting them back together, they will fog up. You can use rtv to re seal them, but then it become difficult to reopen them.
This method will give you a 100% perfect seal, no fog and you can re open them if needed.
i am not responsible for any damage you do while doing this DIY
PLEASE STICKY THIS IF POSSIBLE
This method will give you a 100% perfect seal, no fog and you can re open them if needed.
i am not responsible for any damage you do while doing this DIY
PLEASE STICKY THIS IF POSSIBLE
Tools/materials needed
My sisters 6ga had some water build up on the inside so i opened it up to clean it up
Step 1 Remove the headlight(s) Search for a diy if needed
Step 2 Remove all the bulbs and the rubber seals
Step 3 Pre heat oven to 295, then place wood on the stove rack
Step 4 Place the headlight in for 10 mins

Step 5 Remove the headlight, pry the tabs up just enough. BE CAREFUL not to break them. start at the corner by the highbeam and pry it open. A knife is usefull to cut the strands of glue. clean the reftector, housing and lenses if needed
Step 6 Take your ribbon sealer or butyl, run it around the edge where the oem glue is, stretching it slightly as you go


Step 7 Place the half with the reflectors back in the oven at 295 for 5 minutes, just to soften the glue.
Step 8 Remove the piece from the oven and press the lens and back part together, lining up the tab. place back in the oven for 10 minutes again at 295
Step 9 Using zip ties and/or clamps secure the parts together until cooled

Step 10 Remove the clamps and zip ties, reinstall and admire the new clean headlight
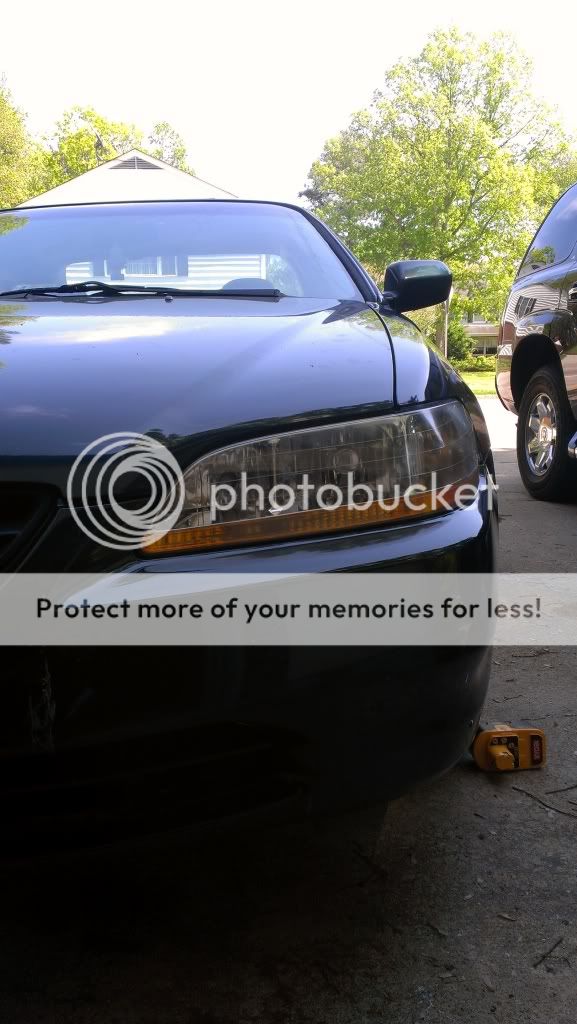
my retros after a wash sealed with this method. no fog

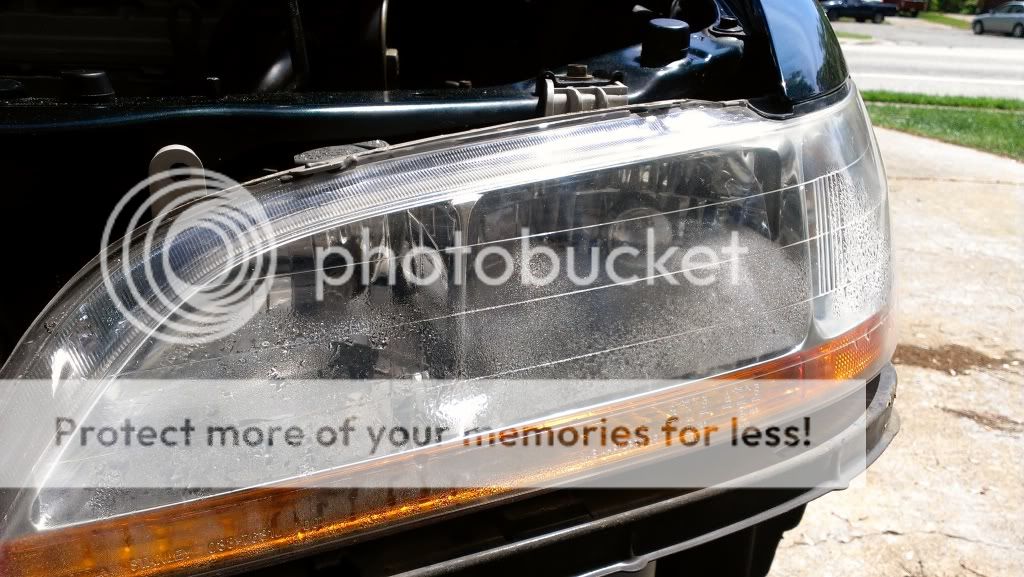
OEM black housings sealed with only the remaining oem glue, after a wash. FOGGY no bueno

- 10mm socket and extension
- Gloves
- oven
- Rubber butyl
3m window ribbon <-what i used
The retrofit source butyl - big zip ties/clamps
- flat head screw driver
My sisters 6ga had some water build up on the inside so i opened it up to clean it up

Step 1 Remove the headlight(s) Search for a diy if needed
Step 2 Remove all the bulbs and the rubber seals
Step 3 Pre heat oven to 295, then place wood on the stove rack
Step 4 Place the headlight in for 10 mins

Step 5 Remove the headlight, pry the tabs up just enough. BE CAREFUL not to break them. start at the corner by the highbeam and pry it open. A knife is usefull to cut the strands of glue. clean the reftector, housing and lenses if needed
Step 6 Take your ribbon sealer or butyl, run it around the edge where the oem glue is, stretching it slightly as you go


Step 7 Place the half with the reflectors back in the oven at 295 for 5 minutes, just to soften the glue.
Step 8 Remove the piece from the oven and press the lens and back part together, lining up the tab. place back in the oven for 10 minutes again at 295
Step 9 Using zip ties and/or clamps secure the parts together until cooled

Step 10 Remove the clamps and zip ties, reinstall and admire the new clean headlight

my retros after a wash sealed with this method. no fog

OEM black housings sealed with only the remaining oem glue, after a wash. FOGGY no bueno