Dat99accord
Well-Known Member
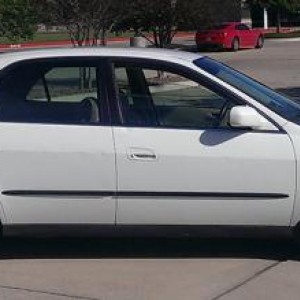
Got bored n decided to make a DIY on plasti dipping rims 
Although I know many people frown upon using plastidip on cars, it's still provides an easy and cheap way to change colors.
Tools:
- 4 or 5 cans of white plastidip
- Water
- Soap
- Microfiber cloth
- Index cards
- OPTIONAL: 2 or 3 cans Glossifier (This is if you want your wheels to shine a bit. For black plastidip, it's harder for the dip to get glossy than the white so you would need more cans of gloss.

Step 1: Clean the rims using water, soap, and maybe a microfiber/terry cloth. (Make sure it is clean and shiney.)
Step 2: Dry the rims using a microfiber cloth because it doesn't leave any residue. (make sure they are completely dry because this will f*** up your plastidip if you don't dry it completely)
Step 3: Find something (a huge cardboard) and lay it underneath the rim so that you don't paint your ground. (unless you want to)
Step 4: Either tape up or place index cards around the edges of the rim. Like so, covering up the tires so they dip wont get on it.

Step 5: Shake up your plastidip can for about a minute. (Make sure you shake it real good. ) After shaking it, hold the can about a foot away from the surface of the rim. Then spray on lightly, with a side to side motion. After your first coat it should look something like this


Step 6: Ok so after the first coat, this is were it gets time consuming, it is recommend to wait at least 30 mins after your first coat to apply the second coating. Me however, being the person who cant simply wait, continued to spray second layer after 15 mins. So it is up to you if you want to wait. (recommended that you do)
Step 7: So here I began to place in my other wheels so I can dip them, while I waited for the other two rims to dry.

Step 8: Ok so after applying about 4 coats of white plastidip and letting them dry out. I then applied my glossifier. Same thing goes with the gloss, you shake, spray, and leave to dry, then continue to add layers of gloss coatings.

Step 9: After 4 coats of white plastidip, and 3 coats of gloss. simply remove the index cards and let it dry.


^ DAT GLOSS
Done! hope you guys like your outcome.
Oh and to clean it, I use Simple Green. Just spray on the dip, let it settle for about one minute, use a soft brush and start brushing (don't use too much strength), spray it down with water, and done, it should be looking like new.
Although I know many people frown upon using plastidip on cars, it's still provides an easy and cheap way to change colors.
Tools:
- 4 or 5 cans of white plastidip
- Water
- Soap
- Microfiber cloth
- Index cards
- OPTIONAL: 2 or 3 cans Glossifier (This is if you want your wheels to shine a bit. For black plastidip, it's harder for the dip to get glossy than the white so you would need more cans of gloss.
Step 1: Clean the rims using water, soap, and maybe a microfiber/terry cloth. (Make sure it is clean and shiney.)
Step 2: Dry the rims using a microfiber cloth because it doesn't leave any residue. (make sure they are completely dry because this will f*** up your plastidip if you don't dry it completely)
Step 3: Find something (a huge cardboard) and lay it underneath the rim so that you don't paint your ground. (unless you want to)
Step 4: Either tape up or place index cards around the edges of the rim. Like so, covering up the tires so they dip wont get on it.
Step 5: Shake up your plastidip can for about a minute. (Make sure you shake it real good.
) After shaking it, hold the can about a foot away from the surface of the rim. Then spray on lightly, with a side to side motion. After your first coat it should look something like this
Step 6: Ok so after the first coat, this is were it gets time consuming, it is recommend to wait at least 30 mins after your first coat to apply the second coating. Me however, being the person who cant simply wait, continued to spray second layer after 15 mins. So it is up to you if you want to wait. (recommended that you do)
Step 7: So here I began to place in my other wheels so I can dip them, while I waited for the other two rims to dry.
Step 8: Ok so after applying about 4 coats of white plastidip and letting them dry out. I then applied my glossifier. Same thing goes with the gloss, you shake, spray, and leave to dry, then continue to add layers of gloss coatings.
Step 9: After 4 coats of white plastidip, and 3 coats of gloss. simply remove the index cards and let it dry.
^ DAT GLOSS
Done! hope you guys like your outcome.
Oh and to clean it, I use Simple Green. Just spray on the dip, let it settle for about one minute, use a soft brush and start brushing (don't use too much strength), spray it down with water, and done, it should be looking like new.