★ Russianred's Turbo Build Thread! ★ *UPDATED 4/15* ★

Russianred

Snail Spools You!
Joined
Jan 10, 2007
Posts
9,455
Reaction score
50
Location
Southern Maine [207]
Re: Russianred's Turbo Build Thread! *UPDATED 8/8/11*

So I finally tallied the weight removed so far, the seam sealer and sound deadening was officially just over 30 pounds, when I got my hands on an accurate scale.

8 lbs. - rear door panels
10 lbs. - rear seat bottom
15 lbs. - rear seat back
6 lbs. - rear seat side bolsters
30 lbs. - sound deadening tar / seam sealer
10 lbs. - trunk floor liner
7 lbs. - left and right trunk liner panels
15 lbs. - interior carpeting (not including front footwell areas which I left intact)
12 lbs. - stock radiator and fan enclosures
22 lbs. - air conditioning system
20 lbs. - rear seat belts, handles, levers, miscellaneous plastic trunk panels.
Total so far: 155 lbs.

Going to dissect the dash when I have time to see if there are any extra AC components still lingering in there. The only things that were left interior-wise was sound deadening tar and carpet in the front footwell areas, and obviously the dash with all its items. Any ideas on what else I should remove?
 
Last edited:

Ilovemy6thgen

Well-Known Member
Joined
Sep 11, 2010
Posts
467
Reaction score
0
Location
louisville
Re: Russianred's Turbo Build Thread! *UPDATED 8/8/11*

So I finally tallied the weight removed so far, the seam sealer and sound deadening was officially just over 30 pounds, when I got my hands on an accurate scale.

8 lbs. - rear door panels
10 lbs. - rear seat bottom
15 lbs. - rear seat back
6 lbs. - rear seat side bolsters
30 lbs. - sound deadening tar / seam sealer
10 lbs. - trunk floor liner
7 lbs. - left and right trunk liner panels
15 lbs. - interior carpeting (not including front footwell areas which I left intact)
12 lbs. - stock radiator and fan enclosures
22 lbs. - air conditioning system
20 lbs. - rear seat belts, handles, levers, miscellaneous plastic trunk panels.
Total so far: 155 lbs.

Going to dissect the dash when I have time to see if there are any extra AC components still lingering in there. The only things that were left interior-wise was sound deadening tar and carpet in the front footwell areas, and obviously the dash with all its items. Any ideas on what else I should remove?

Holly shat! I bet your car floats now. Rofl
 

hondatech03

Well-Known Member
Joined
Apr 6, 2010
Posts
204
Reaction score
3
Location
Texas
Re: Russianred's Turbo Build Thread! *UPDATED 8/8/11*

Going to dissect the dash when I have time to see if there are any extra AC components still lingering in there. The only things that were left interior-wise was sound deadening tar and carpet in the front footwell areas, and obviously the dash with all its items. Any ideas on what else I should remove?

155 pounds so far awesome :thumbsup:
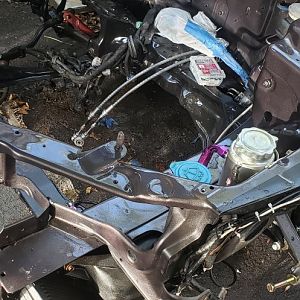
. I would take out the ac ducts, blower, ect. Here are some pics to help you out.

1033592.png


1033594.png
 

Russianred

Snail Spools You!
Joined
Jan 10, 2007
Posts
9,455
Reaction score
50
Location
Southern Maine [207]
Re: Russianred's Turbo Build Thread! *UPDATED 8/23/11*

True enough I could remove those, but would that affect my heating situation as well? See I want to keep the heat for cold times, since it's there already and is not tied into the works as the AC was.. AC removal was for many reasons, which absence of I can live with. Will removal of pictured ducts also affect my heatnig as I am thinking it will?

Then again if they are the rear ducts then it won't matter because I can just retro-route those to the front, as I have no rear area..

Gonna have to look at this diagram more as it is 3:40am here, and I am crunked out right now. Tomorrow will be a more productive day haha.

Thank you for the input, and rep granted for the diagrams, I could really use those.
 
Last edited:

hondatech03

Well-Known Member
Joined
Apr 6, 2010
Posts
204
Reaction score
3
Location
Texas
Re: Russianred's Turbo Build Thread! *UPDATED 8/23/11*

True enough I could remove those, but would that affect my heating situation as well? See I want to keep the heat for cold times, since it's there already and is not tied into the works as the AC was.. AC removal was for many reasons, which absence of I can live with. Will removal of pictured ducts also affect my heatnig as I am thinking it will?

Then again if they are the rear ducts then it won't matter because I can just retro-route those to the front, as I have no rear area..

Gonna have to look at this diagram more as it is 3:40am here, and I am crunked out right now. Tomorrow will be a more productive day haha.

Thank you for the input, and rep granted for the diagrams, I could really use those.

Your welcome. Thanks for the rep. If you do remove everything you will lose your heater, so, what you can do is replace the ac unit with the heater duct from the dx.

This is what you have now.


and what you can do is replace the a/c cooling unit and evap with this
1033547.png


You can buy it at honda parts deals its #1. This will remove all ac components and let you keep your keep your heater.
 

Russianred

Snail Spools You!
Joined
Jan 10, 2007
Posts
9,455
Reaction score
50
Location
Southern Maine [207]
Re: Russianred's Turbo Build Thread! *UPDATED 8/23/11*

Well life is bringing me a new horizon. Good news is that the Accord will be back on the streets in a few weeks here. Bad news is that it won't be the built engine like I intended, due to my recent graduation, fund limitations, upcoming relocation and bigger and better life circumstance! Definitely will be much improved over my old setup in various ways, such as motor mounts and weight reduction.. As well as an 80,000 mile bottom end, as compared to my blown 135k+ original bottom end.

Does anyone know the part number to the SHORTER "DX" model belt which does NOT account for the AC? I have deleted my AC and have been looking for the "DX" shorter belt.. Called Autozone (For that belt I don't think it needs to be specifically a Honda branded Mitsuboshi), and they have the same part number for EX, LX, and DX models.. And they said that their computer didn't specify the DX as having no AC. Interesting.

The built engine will be a work on the side for the time being, as I start a new job and settle in at my new living location these next few months.
 
Last edited:

Russianred

Snail Spools You!
Joined
Jan 10, 2007
Posts
9,455
Reaction score
50
Location
Southern Maine [207]
Re: Russianred's Turbo Build Thread! *UPDATED 9/21/11*

Ordered my DX belt W/O AC... As well as the Nippon Leakless MLS head gasket. Should be here by next week.

I have another goodie arriving in a few weeks as well which I haven't talked about yet..
 

Russianred

Snail Spools You!
Joined
Jan 10, 2007
Posts
9,455
Reaction score
50
Location
Southern Maine [207]
Re: Russianred's Turbo Build Thread! *UPDATED 9/21/11*

Polyurethane Mounts.

Information researched from: http://www.forschpolymer.com/UrethaneSystems.html

After spending about 20 minutes on the phone with Gary from Forsch Polymer Co., I realized that this is the best option for us: $33.01 per kit, ~$7.00 shipping 2-3 day parcel post. For the two kits I just bought, I paid ~$74.00 SHIPPED!

88A - FDA88A. It is actually not listed on the site, but it is the same chemistry as the listed 95A 2495, but its catalyst is FDA compliant, and 7 durometer points softer - making it 88A. Gary told me that this is the stuff that shops and companies get to make racing bushings. Still harder than most Innovative Mounts can achieve... The way stock mounts are made, they provide for even more support than the Innovative ones. Can't beat the price either.

The kits can be obtained through McMasterr Carr, Illinois division – 1 (630) 833-0300.

Ask for the 88A FDA88A kit, stock number: 8644K41. It is a 1lb. kit, which is white when it cures. It yields 0.5 qt or a pint. Get 2 kits for 3 mounts. There may be some left over for the right side mount depending on how you decide to mold your other mounts.

Comes as a thick paste. Heat the can up to melt it. Next stir it, pour in the bottle of catalyst, and pour in your prepped mounts quickly - begins hardening in 5 minutes! After this, leave it in the oven for 12 hours at 120-150 degrees to cure. When prepping your mounts for filling, make sure that there is absolutely NO MOISTURE and NO GREASE on them!! The presence of either will cause the polymer to foam and ruin your mold on those areas. The hotter you heat the polymer substrate prior to adding the catalyst, the longer it stays liquid and allows more time to pour the molds. Once the catalyst is added, your time is limited to 5-7 minutes depending on the initial temperature of the polymer substrate and mounts. A good idea is to bake the clean mounts in the oven to first get rid of the moisture, and second to keep them as hot as possible prior to pouring the liquid polyurethane in. Tinfoil, taped to seal everything in is a good barrier to use when pouring the mold. DIY's with pictures for this process are also readily available on other forums, look there for further reference. I may however make my own DIY when I do this so that you all can see it specifically with our car.

I will post the results and pictures as soon as I complete this process.
 
Last edited:

hondatech03

Well-Known Member
Joined
Apr 6, 2010
Posts
204
Reaction score
3
Location
Texas
Re: Russianred's Turbo Build Thread! *UPDATED 9/21/11*

sounds cool. cant wait to see how the mounts turn out. keep me posted
 
Back
Top