

KnightRyder
Well-Known Member
A little while ago i said i'd make this DIY so here i am... and still not done with all my pieces but very close ")
Some of you may find my processes/materials a bit excessive but im just showing you how I did it, you can do it however you wish, using whatever you want.
Materials I Used:


Tips:


After Sanding down the bumps:


Step 2: Time to primer. But before you do, wash the piece with dishwasher soap to remove any oils from your hands to make sure the primer sticks well. Make sure you're in a ventilated area because paint can smell up a room fast, and it not a healthy smell either. Spray a thin light coat first making sure you cover all the edges as well. Dont rush and spray a fat coat because you'll end up with runs and more work later. wait 10 minutes between coats. I shot 3 layers of primer, first coat was super thin, second and third coats were medium thickness. I let my primer dry for a few hours before i touched it again.


Step 3: I then sanded the primer using 1000grit sandpaper to help level it out and fill the minor imperfections and leave me with as smooth a painting surface as possible. Just dont apply a ton of pressure because the primer may still chip off if you push too hard. Oh and dont sand all the way through the primer, just level it off.


Step 4: Now you're ready to paint. But before you start, wash the piece using dishwasher soap to get rid of any dust and oils you put on the piece while you were touching it. just apply the soap to the piece directly and use your finger to rub it over the painted areas and make sure you rinse off ALL the soapy residue and try not to touch the painted areas with your hands again. Let it dry fully before you begin painting. I spraying 3 coats of paint on all of my pieces, and like before... first coat is thin, second and third coats are medium thickness. I let the paint dry at least overnight just because i felt like it was a good thing to do before i started working with it again. If you look close, you'll see some areas with the common "orange peel" effect. dont worry, we'll get rid of that in the next step.

Step 5: After the paint has had sufficient time to dry, time to wetsand. I placed the piece in my kitchen sink and ran water over the areas i was sanding. I used 1000-1500grit sandpaper depending how bad the orange peel was. just take your time and be careful not to sand threw the paint, its pretty easy to do if you're not paying attention. it doesnt take a whole lot of effort to get rid of orange peel so again, dont apply a lot of pressure, just keep your eye on it. you can see that we've lost the shine, dont worry.


Step 6: Time to bring a shine back. Get out a few towels (preferably microfiber) and get some rubbing compound (its a paste) and start rubbing all over the place with reasonable amount of pressure. I just used my judgment to determine whether i needed to use the rubbing compound once or twice, use yours. Make sure you rub off all the compound after you apply it. After that, use the Polishing compound which does basically the same thing but on a finer level. again, use your judgment to determine when you've got a decent shine back, you wont get a mirror shine so dont expect it yet.


Step 7: Time for clear. But again, wash the piece thoroughly with soap to remove the oils from your hands again. And for the clear, i spray 4 coats, 1 thin, 2 medium, and the final coat a medium-thick coat (be careful about runs) and as always, wait 10 minutes between coats! And once again, i let this piece dry overnight before handling it.
(Sorry, forgot to take pics after the clear coat, i just moved on with wetsanding in the next step)
Step 8: To some people, you could stop after the clear, but im going for the smoothest look possible so im going to wetsand again with the 1500grit sandpaper.


Step 9: As you can see, the shine is gone again because we wetsanded. Just like before, use the Rubbing Compound, then the Polishing Compound. But since this is going to be our final "finished" layer, we continue with more shining. Use the Meguiars Scrath-X to help remove fine scratches that the rubbing and polishing compounds couldnt get. Then i start applying my waxes/polishes. Start with a layer of Meguiars Step 1 Cleaner Wax, then move on to Meguairs Step 2 Polish, you may want to do that step twice because it really brings out the shine. Then i used EagleOne NanoWax to fill in tiny little swirls and marks. Then i used Meguairs Step 3 Carnauba Wax as my final coat for stregth. And after allllllll that hard work, you get to step back and watch your work shine Take a good look at the clarity of this... see, the extra work pays off!


like a mirror baby!!!!

================================================
ENGINE COVERS:
All the steps are exactly the same except for the first sanding stage, instead of using the 400grit, use the lower 220grit because the engine covers are much more textured than the interior pieces. And i used a High Temp Primer instead. But i used the same color since there is no High Temp color like i was using. then i used High Temp Clear.
oh and with the High Temp Clear, when you spray it, it may turn a milky white, dont freak out, it will dry crystal clear.

Here's a pic of my covers sitting on the dining table waiting to be installed:

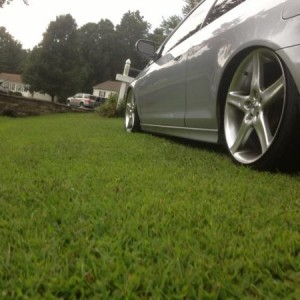
and a pic to show how well the color matches my rims

Now here's another tip: although the paint it dry to the touch, it will stay soft for several weeks. so to help with the proper and full paint curing process, i put my pieces out in the sun to "bake", i did that for about a week or until the distinct paint smell is gone from the pieces. The longer you wait to install the pieces the better because the paint will cure better aka Harder. i dont know if this is actually a fact but i read that on another forum and it makes sense so i did it. And since im in no rush to get these things back in, i had no problem waiting to install these pieces. as we speak, they're still sitting on my table, probably gonna install everything this weekend.
and for those of you who want to see what everything looks like inside the car... you'll have to wait until i get off my lazy *** and install everything, clean everything, take a photoshoot of my car, and make a member rides thread so until then, just use your imagination.
and good luck!
btw, im not responsible for anything you may damage while doing this.
Some of you may find my processes/materials a bit excessive but im just showing you how I did it, you can do it however you wish, using whatever you want.
Materials I Used:
- 220grit sandpaper (used for engine covers)
- 400grit sandpaper (used for interior trim)
- 1000-1500grit sandpaper (used for wetsanding)
- Duplicolor Sandable Primer (used for interior trim)
- Duplicolor Paint (Color of your choice)
- Duplicolor Clear (used for interior trim)
- Duplicolor High Temp Primer (used for engine covers)
- Duplicolor High Temp Clear (used for engine covers)
- TurtleWax Rubbing Compound
- TurtleWax Polishing Compound
- Meguiars Scratch-X
- Meguiars Step1: Cleaner Wax
- Meguairs Step2: Polish
- EagleOne NanoWax
- Meguiars Step3: Carnauba Wax
Tips:
- Paint in a ventilated area
- Wait at least 10 minutes between layers of paint
- Wait several hours before handleing the painted pieces
- Use a sanding block if you have one
- Wait as long as possible before reinstalling pieces to allow for a full and proper cure.
After Sanding down the bumps:
Step 2: Time to primer. But before you do, wash the piece with dishwasher soap to remove any oils from your hands to make sure the primer sticks well. Make sure you're in a ventilated area because paint can smell up a room fast, and it not a healthy smell either. Spray a thin light coat first making sure you cover all the edges as well. Dont rush and spray a fat coat because you'll end up with runs and more work later. wait 10 minutes between coats. I shot 3 layers of primer, first coat was super thin, second and third coats were medium thickness. I let my primer dry for a few hours before i touched it again.
Step 3: I then sanded the primer using 1000grit sandpaper to help level it out and fill the minor imperfections and leave me with as smooth a painting surface as possible. Just dont apply a ton of pressure because the primer may still chip off if you push too hard. Oh and dont sand all the way through the primer, just level it off.
Step 4: Now you're ready to paint. But before you start, wash the piece using dishwasher soap to get rid of any dust and oils you put on the piece while you were touching it. just apply the soap to the piece directly and use your finger to rub it over the painted areas and make sure you rinse off ALL the soapy residue and try not to touch the painted areas with your hands again. Let it dry fully before you begin painting. I spraying 3 coats of paint on all of my pieces, and like before... first coat is thin, second and third coats are medium thickness. I let the paint dry at least overnight just because i felt like it was a good thing to do before i started working with it again. If you look close, you'll see some areas with the common "orange peel" effect. dont worry, we'll get rid of that in the next step.
Step 5: After the paint has had sufficient time to dry, time to wetsand. I placed the piece in my kitchen sink and ran water over the areas i was sanding. I used 1000-1500grit sandpaper depending how bad the orange peel was. just take your time and be careful not to sand threw the paint, its pretty easy to do if you're not paying attention. it doesnt take a whole lot of effort to get rid of orange peel so again, dont apply a lot of pressure, just keep your eye on it. you can see that we've lost the shine, dont worry.
Step 6: Time to bring a shine back. Get out a few towels (preferably microfiber) and get some rubbing compound (its a paste) and start rubbing all over the place with reasonable amount of pressure. I just used my judgment to determine whether i needed to use the rubbing compound once or twice, use yours. Make sure you rub off all the compound after you apply it. After that, use the Polishing compound which does basically the same thing but on a finer level. again, use your judgment to determine when you've got a decent shine back, you wont get a mirror shine so dont expect it yet.
Step 7: Time for clear. But again, wash the piece thoroughly with soap to remove the oils from your hands again. And for the clear, i spray 4 coats, 1 thin, 2 medium, and the final coat a medium-thick coat (be careful about runs) and as always, wait 10 minutes between coats! And once again, i let this piece dry overnight before handling it.
(Sorry, forgot to take pics after the clear coat, i just moved on with wetsanding in the next step)
Step 8: To some people, you could stop after the clear, but im going for the smoothest look possible so im going to wetsand again with the 1500grit sandpaper.
Step 9: As you can see, the shine is gone again because we wetsanded. Just like before, use the Rubbing Compound, then the Polishing Compound. But since this is going to be our final "finished" layer, we continue with more shining. Use the Meguiars Scrath-X to help remove fine scratches that the rubbing and polishing compounds couldnt get. Then i start applying my waxes/polishes. Start with a layer of Meguiars Step 1 Cleaner Wax, then move on to Meguairs Step 2 Polish, you may want to do that step twice because it really brings out the shine. Then i used EagleOne NanoWax to fill in tiny little swirls and marks. Then i used Meguairs Step 3 Carnauba Wax as my final coat for stregth. And after allllllll that hard work, you get to step back and watch your work shine
Take a good look at the clarity of this... see, the extra work pays off!
like a mirror baby!!!!
================================================
ENGINE COVERS:
All the steps are exactly the same except for the first sanding stage, instead of using the 400grit, use the lower 220grit because the engine covers are much more textured than the interior pieces. And i used a High Temp Primer instead. But i used the same color since there is no High Temp color like i was using. then i used High Temp Clear.
oh and with the High Temp Clear, when you spray it, it may turn a milky white, dont freak out, it will dry crystal clear.
Here's a pic of my covers sitting on the dining table waiting to be installed:
and a pic to show how well the color matches my rims
Now here's another tip: although the paint it dry to the touch, it will stay soft for several weeks. so to help with the proper and full paint curing process, i put my pieces out in the sun to "bake", i did that for about a week or until the distinct paint smell is gone from the pieces. The longer you wait to install the pieces the better because the paint will cure better aka Harder. i dont know if this is actually a fact but i read that on another forum and it makes sense so i did it. And since im in no rush to get these things back in, i had no problem waiting to install these pieces. as we speak, they're still sitting on my table, probably gonna install everything this weekend.
and for those of you who want to see what everything looks like inside the car... you'll have to wait until i get off my lazy *** and install everything, clean everything, take a photoshoot of my car, and make a member rides thread so until then, just use your imagination.
and good luck!
btw, im not responsible for anything you may damage while doing this.
Last edited: