It's been my experience that the EVAP parts I bought from Advance Auto for Hondas have been exactly the same (OEM part numbers, markings, stickers, etc.) as the ones I get at the dealer...except they are about 40% less expensive. The difference is the dealer always has them in stock, but the parts stores may not.
I wouldn't let P1457 go too long. Something I wrote for another forum:
-------------------------------------------------------------------
P1457 is caused when there is a leak detected in the EVAP emissions system. This system collects and stores fuel vapors in a special canister until conditions are met which allow them to be burned off by the engine. This is not to be confused with a P1456 fault which may happen with a loose gas cap.
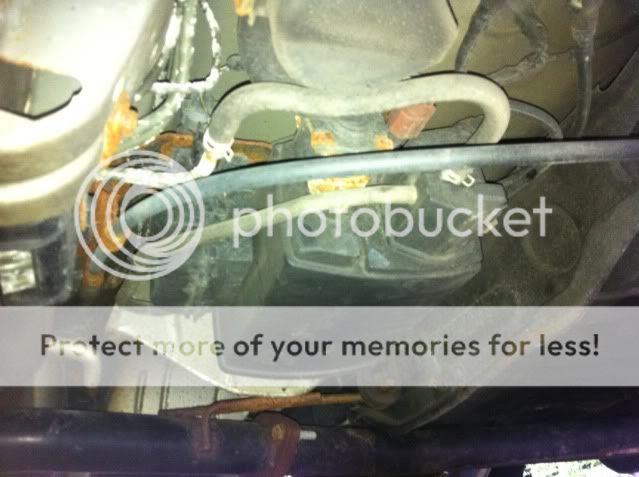
Many Honda models between 1998-2004 have problems with this system because of it’s design. Honda put several of the key components in a very susceptible area – next to the driver’s side rear wheel well (at least that's the location on the Accord). When you drive in wet conditions, these components get splashed with water. Even worse, in the ‘rust belt states', the components get splashed with ice/snow melting chemicals, which are even more corrosive. With time, the water, or chemicals, corrode the exterior of the parts and work their way down into the components, and start corroding them on the inside. Once the components start to corrode on the inside it’s very likely they can short out.
Unlike many other faults which set a Check Engine Light (CEL), this is one you DO NOT want to ignore. If a component shorts out, when the Powertrain Control Module (PCM, the computer that runs the engine) tries to activate the valve/solenoid, it instead finds a dead short...which can blow the transistor controlling that output. Once that happens, there’s no fix – except a new (expensive) PCM. Unfortunately, the EVAP system ‘runs’ whenever the PCM sees that the correct conditions are present – that means that it may run several times a day on 1 vehicle, and a lot less frequently on another, it’s all based on what the conditions are. Which is to say, one vehicle may have PCM damage happen quickly, while another may not. To avoid the possibility of ruining the PCM, its best to fix the problem as soon as possible. If there is damage and you do not replace the PCM, the CEL will never go away, and in many states that means you will fail the Emissions Inspection.
Most likely, the fault is being caused by 1 or 2 components: The Canister Vent Shut Valve, or the EVAP Two-way Valve Solenoid. Depending on the situation, you may be better off dropping the EVAP canister (the rectangular plastic canister next to the driver’s side rear wheel) down to get at the components – once you unplug any hoses/connectors going to/from the canister, there is 1 bolt that holds the canister to the vehicle. Make sure you label where everything goes, and plug any hoses – there may be gasoline fumes coming from them. Note that some hoses are longer and may allow you to drop the canister with them attached.
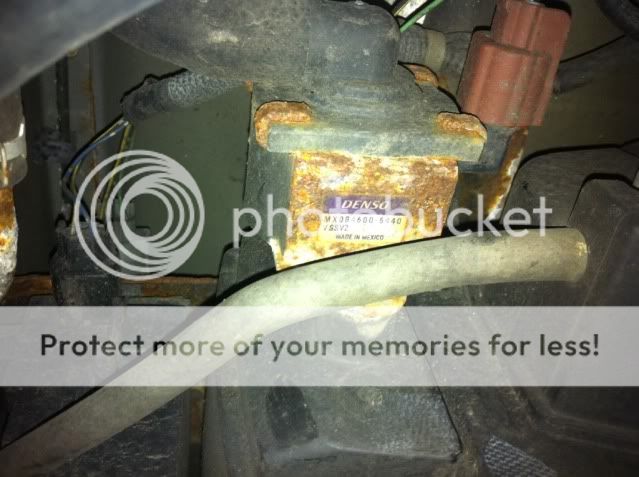
The Canister Vent Shut Valve is mounted on the EVAP canister, has an electrical connector and a large hose connected to it. It’s attached to the canister using 2 Phillips head screws. It’s a good bet that these are very corroded. You can try spraying some rust penetrant on them and let it sit a while before attempting to remove the valve, but chances are you may strip the screw heads. If that happens, option 2 is to use a set of needle-nose locking pliers (like Vice-Grips) to clamp onto the screw heads and slowly work them out, taking your time and working the screws back & forth. If at any point the screw stops turning, STOP. Screw it back in a ways, then back out. Don't force them out - the screw threads are mounted in the plastic canister housing and can break off.
Once the valve is out you can test for a short or stuck valve by applying 12V to the terminals – make sure you check for any polarity labels on the valve. You should hear it click. But even if it does click, it may still leak/vent to the outside due to corrosion of the outer clamp assembly that holds it together. If you want to test for that you need to plug one side, apply a few PSI of pressure on the other side by using a Mityvac or something similar, and brush a soap solution around the seams. You will see it bubble around the areas that it leaks. In my opinion, for the cost and since you already have it out, replace it – it will eventually fail anyway.
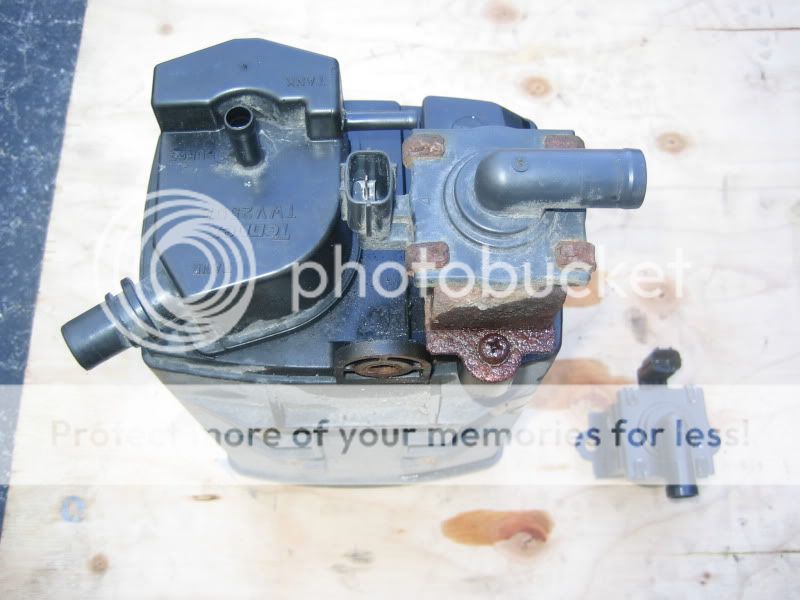
The other likely component is the EVAP Two-Way Valve Solenoid. This unit is under a 2 piece cover, has 2 hoses visible going to it, and is to the side of the EVAP canister. Pry one of the covers off to get access. The hoses attach to the valve, which is probably OK, but the actual solenoid attaches opposite the hoses. The solenoid attaches to the valve using 2 screws, and attaches to the vehicle using 2 screws. There is also an electrical connector at the top. You may need to remove the valve/solenoid as an assembly to check and work on it – if so, there are 3 hoses total connected to it, make sure you plug any hoses as you remove them, and label them so you know where they go.
Once the valve is out you can test for a short or stuck valve by applying 12V to the terminals – make sure you check for any polarity labels on the valve. You should hear it click. If you do not, a replacement solenoid is available, make sure you replace the 2 o-rings that seal it to the valve body.
Re-install everything onto the car reversing your disassembly steps. If possible, reset the Check Engine Light. You should be all set.


") dunce
dunce