method5150
Member
I have noticed a few questions about this install so I decided to do a write-up since I did this set-up on my own ride. This is my first write-up. Any constructive criticism is greatly appreciated.
Parts:
OEM Fog light kit purchased from EBay. Came with all OEM Genuine Honda Parts. approx. 200$.
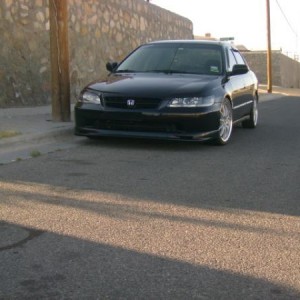
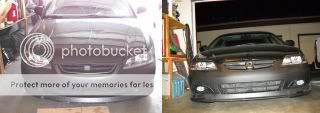
01-02 OEM spec front bumper. Brand is Original Fit and fits like OEM! I also purchased from same seller originalfitcorp rear bumper (rear ended).
rear bumper 242$
front bumper 170$
"Mugen Style" front lip from Ebay. approx 65$ plus s/h.
Eyebrows - 24$ ebay
01-02 Front bumper H emblem (Genuine Honda Parts) 13$ ebay
300$ to paint plus 80$ for supplies ~ color is "hotrod black"
Plethora of zip-ties
Yes, a 01-02 coupe bumper fits a 98-00 accord coupe.
*update* NO FABRICATION is required to install 01-02 coupe bumper on 98-00 Accord!!
No OEM lip is available for the 01-02 coupe which is why I went with the Mugen style front lip.
If you're looking for directions I suggest going to this link(also message me, have it on hard-drive):
http://www.handa-accessories.com/accord/accord01fl2d.pdf
or goto handa-accessories.com and click the 2-door 4cycl install link. The PDF is essential to this install!
1. Take bumper off. (I installed the fog lights first to make sure everything fit). Two screws on each side. One from bumper to fender, other holding in splash shield. Remove all plastic tabs holding in grill, bumper, and splash shield. Pull out sides, pull bumper towards you, should slide off easy.
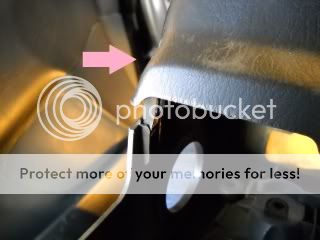
2. Cut off section of plastic that arrow is pointing to. Do this to both sides.
3.
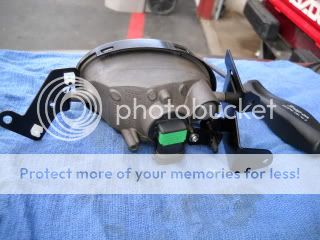
4. Install metal holders onto fog-lights. Each part is labeled Left/Right.
5.
6.
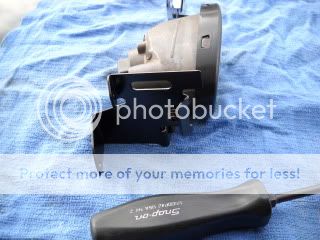
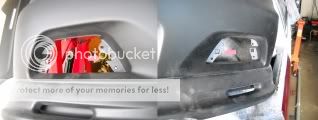
7. Make sure to install white plastic clips as pictured. Also use correct screws with washers to hold plates/holders on fog-lights. You will notice they are not tight but snug allowing for moderate wiggle room. Install fog-light from rear of bumper pushing through and screwing in from front. Notice picture that black screws go on one side and silver on opposite. Silver screws will be blocked by cover and black screws will be visible through vent, makes for a cleaner install.
8.
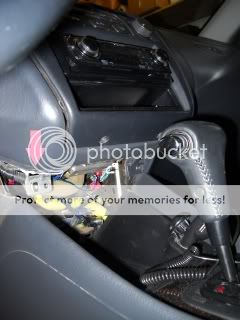
9. Now that the lights are installed time for the fun part, wiring!
10. I started with under-hood wiring first.
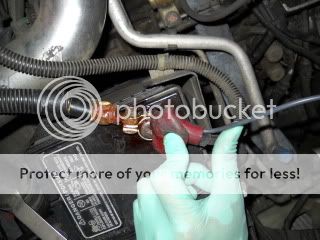
11. Install fusible link on positive + battery terminal. Remove nut install eyelet over bolt and tighten.
12.
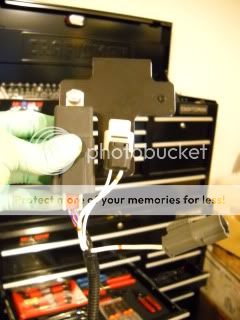
13. Install wiring harness B onto plate that bolts to battery tie-down.
14.
15.
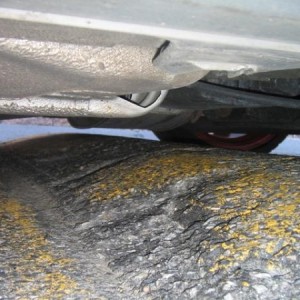
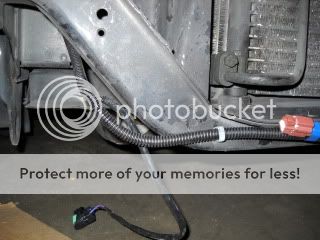
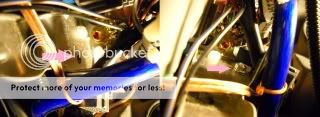
16. I ran wiring harness B down pass. side bottom of lower support along lower radiator support and back up drivers side radiator support through a hole in “frame.” Directions were a little different; I found this to be easiest route. Secure with provided ties that snap into holes already in lower support. Also used various zip ties to secure wiring harness.
17.
18.
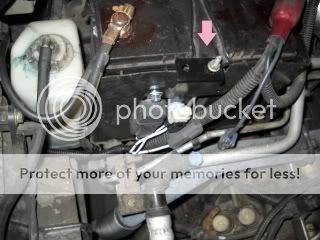
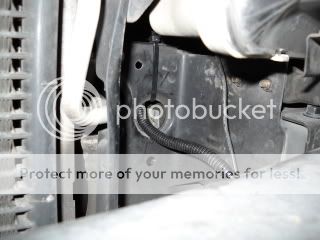
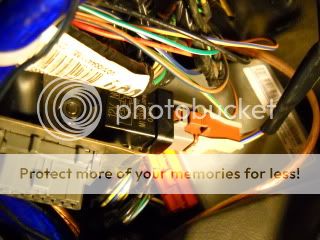
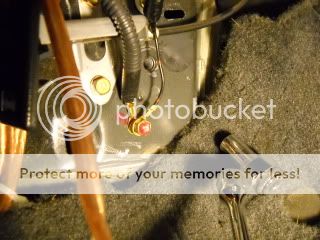
Make sure to screw in grounding wires like image above. bolts are provided. I scratched some of the paint off for a better connection.
19.
20.
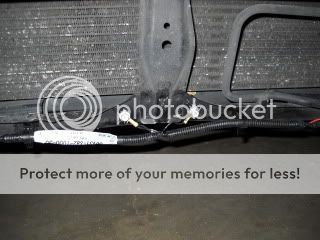
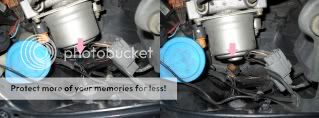
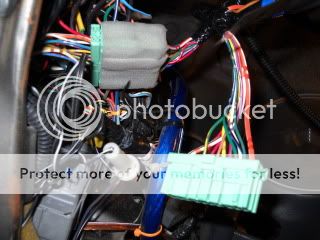
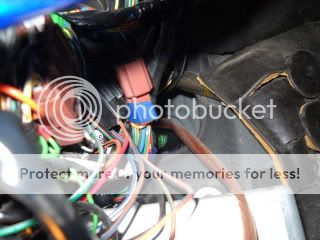
21. Find brown connector that’s secured down with blue tape as pictured. Remove blue tape.
22.
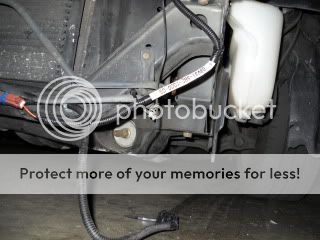
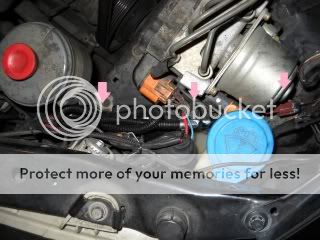
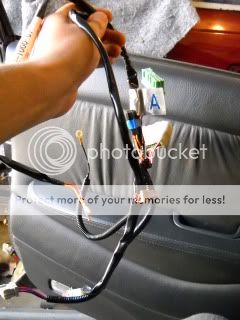
23. Connect male/female brown connectors from wiring harness B to vehicle wiring harness as pictured. Secure with zip-ties. Directions suggested cutting excess wiring to shorten but I just safely looped and secured with zip-ties.
24.
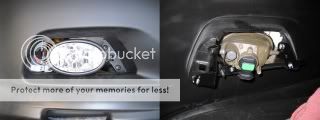
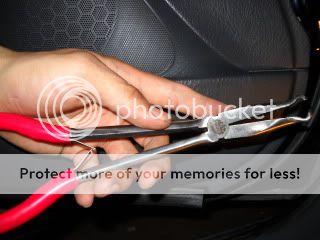
25. Now the exterior fog light wiring is complete. Time to do the interior. I used flat head screw drivers to carefully “pry” connectors lose as most haven’t been touched since the factory slapped this car together. When applicable I used a “hosing remover” to disconnect connectors.
26.
27. First, Start by taking the panel below the instrument bezel. (see picture below)
28. Remove drivers side fuse cover
29. There are two screws holding in lower cover (knee protector) visible once fuse panel is removed. I used a stubby Phillips driver. Also, remove screw on opposite side that’s only visible once lower plate under instrument bezel is removed. Notice arrow. Be careful. You may not notice it and unknowingly break this part as I did a few years back replacing my door popper relays.
30.
31. Remove steering column cover. Lower steering wheel all the way down. Remove three screws securing lower cover to column. 4 tabs holding upper and lower covers together. Push in upper cover and a carefully pull lower cover down. The tabs should snap loose. You may have some trouble with this part so take your time and be patient.
32.
33. Time to install wiring harness “A”.
34.
35. You may find it easier to remove driver’s seat. Mine is electric and heavy so I opted for the
“easier” route of turning myself into a pretzel.
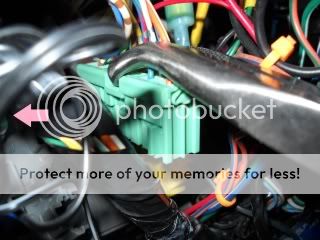
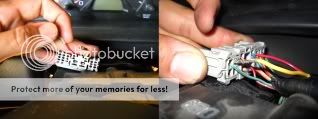
36. You’ll be working upside down for this one. You will notice 4-5 blue-green connectors close to the rear of fuse panel. This is where exterior wiring harness meet interior. Notice picture below. The connector you want is above those 3-4 small gray square type plug-in that arrow is pointing to.
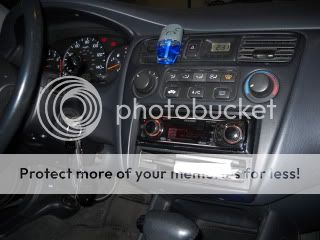
37.

38. This is the plug you want, arrow is pointing to plug you DON’T want. Connectors will only fit specific male to female connectors, can’t really mess this up unless you force it.
39.
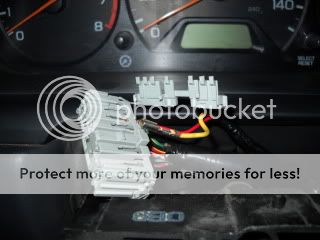
40. Now connect male connector you just disconnected from back of fuse panel to female connector on wiring harness A. Take the matching male connector from fuse A and connect that into back of fuse panel.
41.
42. Bolt in relay using hole right above ECU diagnostic plug in.
43.
44. This is what relay looks like installed. This may look a little different in your Accord because I had to remove the “foot-rest” to install my Kick-panels.
45.
46.
47. Connect ground wire. I used an existing ground connection.
48.
49. There is another brown connector secured with blue tape that’s kind of hidden. You will have to basically rest your head on brake pedal and look up. Un-tape and connect brown female connector from harness A to existing brown male connector you just found.
50.
51. Now run the yellow and red wires up to the multi-function switch (switch that turns headlights on/off, signal lights). Disconnect and install wires in designated ports described in directions found online in .PDF format.
52.
53. It’s super easy to install these wires. Just disconnect that plastic piece as shown in image and wires slip right in. It doesn’t seem to matter if you mix wires from left to right. Fog lights will not turn on when running lights are on. I thought maybe I mixed up wires and switched them, made no difference.
54.
55. Remove coin holder and remove two screws holding in vent.
56.
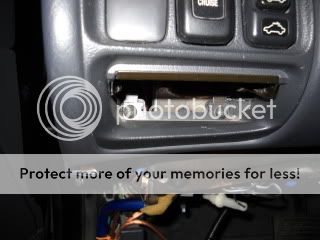
57. Carefully pull vent out, should slip out fairly easy. Remove “dummy” cover by squeezing in (like a pinching motion) tabs and it should pop right out. I chose to install fog-light switch into port and pull male connector up through bottom of dash connecting to switch. Push vent back in. Install screws and coin holder. Bam you’re done! (be careful not to let wires rub against sharp edges of dash pieces.. over time vibration can cause an electric short)
58.

59. Make sure to secure all loose wires with zip-ties. Re-install all covers in appropriate order. First lower “knee” cover, cover under instrument panel, steering wheel column cover, and fuse panel cover. Bam!
60.
61. Install front bumper and connect fog-lights.
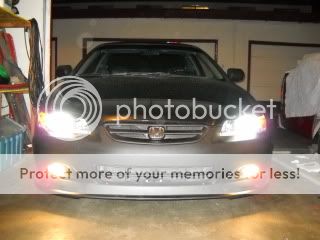
62. Turn key to on position and check out you’re new OEM fog-lights!
63.
64. If you did a 00 to 01 bumper conversion I think you’ll be very happy with the outcome.
65.
66. To adjust the fog-light beam use adjustment screw that has the spring. Install the cosmetic covers. Pat yourself on the back, job well done!
I must stress going with an OEM install. I’ve done a lot of different installs and this is by far the EASIEST. I love my Honda! Very cool to turn the key and everything worked first time… no spare parts, no head scratching, no BS! I hope this write-up helped. Next on the list is 55watt HID for the fogs and high-beams. Also front/back tow-hooks and angled front license plate. Thread would not allow HTML so I apologize for the small hard to view images.
Parts:
OEM Fog light kit purchased from EBay. Came with all OEM Genuine Honda Parts. approx. 200$.
01-02 OEM spec front bumper. Brand is Original Fit and fits like OEM! I also purchased from same seller originalfitcorp rear bumper (rear ended).
rear bumper 242$
front bumper 170$
"Mugen Style" front lip from Ebay. approx 65$ plus s/h.
Eyebrows - 24$ ebay
01-02 Front bumper H emblem (Genuine Honda Parts) 13$ ebay
300$ to paint plus 80$ for supplies ~ color is "hotrod black"
Plethora of zip-ties
Yes, a 01-02 coupe bumper fits a 98-00 accord coupe.
*update* NO FABRICATION is required to install 01-02 coupe bumper on 98-00 Accord!!
No OEM lip is available for the 01-02 coupe which is why I went with the Mugen style front lip.
If you're looking for directions I suggest going to this link(also message me, have it on hard-drive):
http://www.handa-accessories.com/accord/accord01fl2d.pdf
or goto handa-accessories.com and click the 2-door 4cycl install link. The PDF is essential to this install!
1. Take bumper off. (I installed the fog lights first to make sure everything fit). Two screws on each side. One from bumper to fender, other holding in splash shield. Remove all plastic tabs holding in grill, bumper, and splash shield. Pull out sides, pull bumper towards you, should slide off easy.
2. Cut off section of plastic that arrow is pointing to. Do this to both sides.
3.
4. Install metal holders onto fog-lights. Each part is labeled Left/Right.
5.
6.
7. Make sure to install white plastic clips as pictured. Also use correct screws with washers to hold plates/holders on fog-lights. You will notice they are not tight but snug allowing for moderate wiggle room. Install fog-light from rear of bumper pushing through and screwing in from front. Notice picture that black screws go on one side and silver on opposite. Silver screws will be blocked by cover and black screws will be visible through vent, makes for a cleaner install.
8.
9. Now that the lights are installed time for the fun part, wiring!
10. I started with under-hood wiring first.
11. Install fusible link on positive + battery terminal. Remove nut install eyelet over bolt and tighten.
12.
13. Install wiring harness B onto plate that bolts to battery tie-down.
14.
15.
16. I ran wiring harness B down pass. side bottom of lower support along lower radiator support and back up drivers side radiator support through a hole in “frame.” Directions were a little different; I found this to be easiest route. Secure with provided ties that snap into holes already in lower support. Also used various zip ties to secure wiring harness.
17.
18.
Make sure to screw in grounding wires like image above. bolts are provided. I scratched some of the paint off for a better connection.
19.
20.
21. Find brown connector that’s secured down with blue tape as pictured. Remove blue tape.
22.
23. Connect male/female brown connectors from wiring harness B to vehicle wiring harness as pictured. Secure with zip-ties. Directions suggested cutting excess wiring to shorten but I just safely looped and secured with zip-ties.
24.
25. Now the exterior fog light wiring is complete. Time to do the interior. I used flat head screw drivers to carefully “pry” connectors lose as most haven’t been touched since the factory slapped this car together. When applicable I used a “hosing remover” to disconnect connectors.
26.
27. First, Start by taking the panel below the instrument bezel. (see picture below)
28. Remove drivers side fuse cover
29. There are two screws holding in lower cover (knee protector) visible once fuse panel is removed. I used a stubby Phillips driver. Also, remove screw on opposite side that’s only visible once lower plate under instrument bezel is removed. Notice arrow. Be careful. You may not notice it and unknowingly break this part as I did a few years back replacing my door popper relays.
30.
31. Remove steering column cover. Lower steering wheel all the way down. Remove three screws securing lower cover to column. 4 tabs holding upper and lower covers together. Push in upper cover and a carefully pull lower cover down. The tabs should snap loose. You may have some trouble with this part so take your time and be patient.
32.
33. Time to install wiring harness “A”.
34.
35. You may find it easier to remove driver’s seat. Mine is electric and heavy so I opted for the
“easier” route of turning myself into a pretzel.
36. You’ll be working upside down for this one. You will notice 4-5 blue-green connectors close to the rear of fuse panel. This is where exterior wiring harness meet interior. Notice picture below. The connector you want is above those 3-4 small gray square type plug-in that arrow is pointing to.
37.
38. This is the plug you want, arrow is pointing to plug you DON’T want. Connectors will only fit specific male to female connectors, can’t really mess this up unless you force it.
39.
40. Now connect male connector you just disconnected from back of fuse panel to female connector on wiring harness A. Take the matching male connector from fuse A and connect that into back of fuse panel.
41.
42. Bolt in relay using hole right above ECU diagnostic plug in.
43.
44. This is what relay looks like installed. This may look a little different in your Accord because I had to remove the “foot-rest” to install my Kick-panels.
45.
46.
47. Connect ground wire. I used an existing ground connection.
48.
49. There is another brown connector secured with blue tape that’s kind of hidden. You will have to basically rest your head on brake pedal and look up. Un-tape and connect brown female connector from harness A to existing brown male connector you just found.
50.
51. Now run the yellow and red wires up to the multi-function switch (switch that turns headlights on/off, signal lights). Disconnect and install wires in designated ports described in directions found online in .PDF format.
52.
53. It’s super easy to install these wires. Just disconnect that plastic piece as shown in image and wires slip right in. It doesn’t seem to matter if you mix wires from left to right. Fog lights will not turn on when running lights are on. I thought maybe I mixed up wires and switched them, made no difference.
54.
55. Remove coin holder and remove two screws holding in vent.
56.
57. Carefully pull vent out, should slip out fairly easy. Remove “dummy” cover by squeezing in (like a pinching motion) tabs and it should pop right out. I chose to install fog-light switch into port and pull male connector up through bottom of dash connecting to switch. Push vent back in. Install screws and coin holder. Bam you’re done! (be careful not to let wires rub against sharp edges of dash pieces.. over time vibration can cause an electric short)
58.
59. Make sure to secure all loose wires with zip-ties. Re-install all covers in appropriate order. First lower “knee” cover, cover under instrument panel, steering wheel column cover, and fuse panel cover. Bam!
60.
61. Install front bumper and connect fog-lights.
62. Turn key to on position and check out you’re new OEM fog-lights!
63.
64. If you did a 00 to 01 bumper conversion I think you’ll be very happy with the outcome.
65.
66. To adjust the fog-light beam use adjustment screw that has the spring. Install the cosmetic covers. Pat yourself on the back, job well done!
I must stress going with an OEM install. I’ve done a lot of different installs and this is by far the EASIEST. I love my Honda! Very cool to turn the key and everything worked first time… no spare parts, no head scratching, no BS! I hope this write-up helped. Next on the list is 55watt HID for the fogs and high-beams. Also front/back tow-hooks and angled front license plate. Thread would not allow HTML so I apologize for the small hard to view images.
Last edited:
 Just an FYI, Bayson R is releasing an "OE Style" lip for the 01-02 coupes.