Steverino's Road Race Build Thread (Road to CSCS) - Updated almost Daily!!

NASOHC

Well-Known Member
Joined
Sep 19, 2007
Posts
2,062
Reaction score
8
Location
the O.C.
Re: Steverino's Road Race Build Thread (Road to CSCS)

Hey Stephen... nice to see those parts are going to good use. It'll be nice to see it complete. Good luck man and thanks again for the purchase!
 

kteller8

New Member
Joined
Mar 29, 2010
Posts
1
Reaction score
0
Location
FL
Re: Steverino's Road Race Build Thread (Road to CSCS)

Steve, would you mind us listing your story on our website? If you dont mind please shoot me an email [email protected]; As an KTeller exhaust user, I would like to promote your story to others.

- Mike
 

SykVSyx

Well-Known Member
Joined
Jan 6, 2007
Posts
13,940
Reaction score
30
Location
Tee Dot Ohh
Re: Steverino's Road Race Build Thread (Road to CSCS)

Oh yes.....Canada is GOING to be respected up in here!!!!

I know who's who in that picture! :lawl:

Glad to see the project coming along though, wish I got to see the car before the tear down.
 

Steverino

Well-Known Member
Joined
May 4, 2007
Posts
200
Reaction score
1
Location
Near Toronto, Canada
Re: Steverino's Road Race Build Thread (Road to CSCS)

Here's another update:

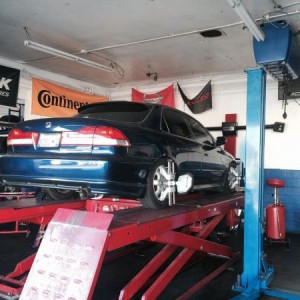
We arrived at the shop to the sight of a some-what large pool of oil. In all our infinite wisdom, when we drained the oil, we left the plug in the pan and didn't plug it up, so while the engine was on the hoist, it was slowly dripping oil and there was oil all over the floor.

Don't worry, we got it cleaned up with some Kitty Litter. YEAAAHHH
IMG_3464.jpg


IMG_3463.jpg


We started work on the interior by first fishing out the bigass 0 gauge power wire for the battery location that was done a few years ago. You NEED a 0 gauge wire to take into account in-line resistive losses for DC currents. For those who haven't dealt with 0 gauge wire, it's heavy and dense as hell. Here are a couple of pictures to show just how big the wire was:

IMG_3466.jpg


IMG_3467.jpg


We'll be re-using some of that but locating the battery in the front passenger foot-well this time, using way less wire.

Next came out the battery and battery tray. We found a nice surprise when we removed the battery tray though:
IMG_3483.jpg


Yup that's mold, I think. Anyway good thing the carpet is coming out!!

In addition to the battery tray, we also found something else while cleaning the interior . . . . :jarred:
IMG_3484.jpg


Some in-progress pictures:
IMG_3482.jpg


IMG_3478.jpg


Some of the stuff that was removed (center console has to be put back in as per CSCS Street Class regulations)
IMG_3488.jpg


Also way back we did a center console height reduction. Because I was using Bride seats and super low rails, the center console lid kept interfering with shifting. So instead of removing the center console entirely and having the interior look perennially ****ty, we cut it down, remolded and repainted the console:
IMG_3492.jpg


IMG_3491.jpg


Interior stripped:
IMG_3487.jpg


And then poof!! The carpet was out. I don't know if it's because it's an Accord and it's supposed to have some semblance of comfort, but the carpet alone was quite thick and at least 25lbs.
IMG_3490.jpg


We didn't get as far as we hoped to last night, mostly due to a local joint serving some half-price pasta around the corner (it was pretty damn good pasta actually). Carb overload and associated "-itis" took over and we called it an early night.

Here are some pictures of some "bonus" items we found:
IMG_3495.jpg
 

hancockd

SLO CG2
Joined
Apr 14, 2006
Posts
4,050
Reaction score
10
Location
Orlando, FL
Re: Steverino's Road Race Build Thread (Road to CSCS)

Don't think I've ever found a bullet in my car :lawl:
 

Steverino

Well-Known Member
Joined
May 4, 2007
Posts
200
Reaction score
1
Location
Near Toronto, Canada
Re: Steverino's Road Race Build Thread (Road to CSCS)

I took some pictures of how the engine sits now as well as the removed engine harness so you guys can see just how piss-poor Honda's harness is:

IMG_3465.jpg


IMG_3461.jpg


The engine/transmission will be totally degreased and cleaned before re-installing back into the car.

Harness:
IMG_3471.jpg


A lot of electrical tape used through-out.
IMG_3473.jpg


IMG_3476.jpg


IMG_3475.jpg


IMG_3474.jpg


The plan with the harness is to completely de-loom it, remove the automatic transmission wires. I'm currently torn between re-looming it with F6 braided wrap-around sleeving or 4:1 shrink tubing through-out.

F6:
03-f6.jpg


04-f6_computer.jpg


4:1 shrink tubing:
01-heat-shrink-4.jpg


The F6 will be much more easy to install because it's essentially a split-open wire loom with 25% overlap, but it's not flame-retardant like the shrink tubing. My primary concern with the shrink tubing is its size (maximum available size is 1.5") and its ability to slip over the pre-existing connectors. I am not rebuilding the harness so the connectors are going to remain un-cut.

Both are equally chemical and UV resistant and has similar operating temperatures:
-40°F to 257°F for the F6
-67°F to 276°F for the shrink tubing

I'll measure some of the connectors tonight and make a decision then.
 

98ExAccordwv

I'm Old
Joined
Mar 6, 2008
Posts
2,640
Reaction score
9
Location
WV
Steve, I know you said you're not rebuilding the harness, but just a suggestion since this will be a race car. Have you thought about doing a connector like this to make pulling the motor easier in the event of a problem?
cbharness1.jpg
 

Steverino

Well-Known Member
Joined
May 4, 2007
Posts
200
Reaction score
1
Location
Near Toronto, Canada
Steve, I know you said you're not rebuilding the harness, but just a suggestion since this will be a race car. Have you thought about doing a connector like this to make pulling the motor easier in the event of a problem?
cbharness1.jpg

Yes I've definitely considered this already, but in actual fact, the engine harness wasn't hard to disconnect from the body of the car. The harness is held in place by a grommet that's loosened by 2 nuts, once the grommet comes out, the harness can be fished out in about 3 minutes.

The Mil-spec disconnect is more for show than functionality. I honestly can't think of a scenario where I'd want to remove the engine harness in under a minute. . .

What WOULD be nice is those custom sensor labels though. Thinking about these. . . .
 

Latest posts

Back
Top