

finch13
Well-Known Member
I bought the Stage 3 kit from TRS since I've been eying these projectors for a while and my DDMs are beginning to **** the bed. I figured anyone else out there considering this retrofit would appreciate some more info.
I have to give credit to Darryl (shavedaccord) for creating the original thread and showing me these projectors.
This isn't a full DIY, as I'm far too lazy to take pictures every step of the way when I do something. I'm hoping this thread can illuminate some corners Darryl left dark to other complete retrofitting noobs like me.
To start out, the build quality is decent. They could probably be more robust, but they're definitely of higher quality than Anzo or TYC projectors. The cutoff is a little fuzzy right out of the box, but the simple "tape mod" takes about 5 minutes to do each projector.
You will need a dremel or small saw to cut the shrouds, they're a tad too big for the OEM reflectors. I believe Darryl cut the reflector to get his to fit and possibly the trim piece (thing you blackhouse, mine aren't fully assembled yet). You'll notice on the shroud that there are 4 large ribs and 4 small ribs; you will needs to cut away most of the bottom rib. It will slightly resemble a triangle when you're done...
One important observation I made about the shrouds is that the hooks (they're designed to snap onto the projector, no JB weld necessary) are not evenly spaced in the shroud. There IS a top to them. They fit really snug around the lens, so they might not snap on right away and it feels like you're going to break something, but they will eventually snap on.
One downside is that the bixenon solenoid wiring is very small, it seems to be around 22 ga and I had to use a razor blade to strip it.
Onto the pics:


Update:
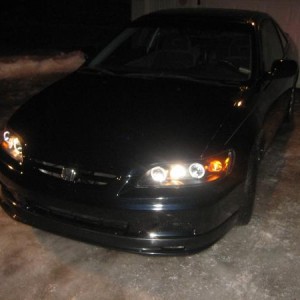
I finished everything and installed them, they look pretty good.
A few observations and pointers:
- Fully adjust the projectors, not just the levelness of the cutoff, before you put on the lenses. Otherwise you will have to trim a lot from the trim piece so you can have more reoom for adjustment after everything is sealed up. If you adjust close to perfect beforehand, you can have a tighter fitting trim piece to the shroud. My trim piece is not trimmed enough and I can't adjust the right projector any farther to the right. Both projector beams intersect each other at about 30-35 ft. They should run parallel to each other in a perfect retrofitting world, but the only negative side effect of it is that the cutoffs spread apart from one another the closer you get to a wall or car.
- I think the trim piece creates a hot spot in the output. When I tested the projectors before installing them, there were no hot spots. Now, I have a full line from the center of the beam (you can see in the pics)
- The lens will hit the shroud a little bit. On one headlight, you can actually feel a very slight bump in the lens where the shroud hits. Also no big deal.
- If you don't trim enough off the bottom of the shroud, it will push the projectors upwards a bit. On mine, the stock high beam hit about 30 ft. in front of the car, not a big deal if you wire up the bixenon solenoids.
Output at 25 ft, low beam. Notice how close the cutoffs are to each other

Output at 25 ft, bixenon + stock 9005 high beam:

Compared to HID kit in stock housing:
Much, much better. No lighting up the interior of the car in front of you, much more reach. I do miss lighting up overhead road signs from a distance though... The bixenon is incredible when used in addition to the stock high beams, I haven't tried them by themselves yet.
I have to give credit to Darryl (shavedaccord) for creating the original thread and showing me these projectors.
This isn't a full DIY, as I'm far too lazy to take pictures every step of the way when I do something. I'm hoping this thread can illuminate some corners Darryl left dark to other complete retrofitting noobs like me.
To start out, the build quality is decent. They could probably be more robust, but they're definitely of higher quality than Anzo or TYC projectors. The cutoff is a little fuzzy right out of the box, but the simple "tape mod" takes about 5 minutes to do each projector.
You will need a dremel or small saw to cut the shrouds, they're a tad too big for the OEM reflectors. I believe Darryl cut the reflector to get his to fit and possibly the trim piece (thing you blackhouse, mine aren't fully assembled yet). You'll notice on the shroud that there are 4 large ribs and 4 small ribs; you will needs to cut away most of the bottom rib. It will slightly resemble a triangle when you're done...
One important observation I made about the shrouds is that the hooks (they're designed to snap onto the projector, no JB weld necessary) are not evenly spaced in the shroud. There IS a top to them. They fit really snug around the lens, so they might not snap on right away and it feels like you're going to break something, but they will eventually snap on.
One downside is that the bixenon solenoid wiring is very small, it seems to be around 22 ga and I had to use a razor blade to strip it.
Onto the pics:
Update:
I finished everything and installed them, they look pretty good.
A few observations and pointers:
- Fully adjust the projectors, not just the levelness of the cutoff, before you put on the lenses. Otherwise you will have to trim a lot from the trim piece so you can have more reoom for adjustment after everything is sealed up. If you adjust close to perfect beforehand, you can have a tighter fitting trim piece to the shroud. My trim piece is not trimmed enough and I can't adjust the right projector any farther to the right. Both projector beams intersect each other at about 30-35 ft. They should run parallel to each other in a perfect retrofitting world, but the only negative side effect of it is that the cutoffs spread apart from one another the closer you get to a wall or car.
- I think the trim piece creates a hot spot in the output. When I tested the projectors before installing them, there were no hot spots. Now, I have a full line from the center of the beam (you can see in the pics)
- The lens will hit the shroud a little bit. On one headlight, you can actually feel a very slight bump in the lens where the shroud hits. Also no big deal.
- If you don't trim enough off the bottom of the shroud, it will push the projectors upwards a bit. On mine, the stock high beam hit about 30 ft. in front of the car, not a big deal if you wire up the bixenon solenoids.
Output at 25 ft, low beam. Notice how close the cutoffs are to each other
Output at 25 ft, bixenon + stock 9005 high beam:
Compared to HID kit in stock housing:
Much, much better. No lighting up the interior of the car in front of you, much more reach. I do miss lighting up overhead road signs from a distance though... The bixenon is incredible when used in addition to the stock high beams, I haven't tried them by themselves yet.
Last edited:
 .
.