donpisto's '01 Accord sedan complete build

donpisto

Well-Known Member
Joined
May 18, 2008
Posts
107
Reaction score
0
Location
Los Angeles, CA
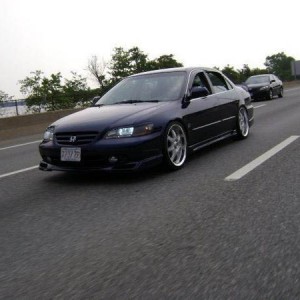
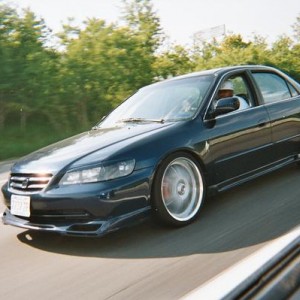
I've been getting mixed reviews about the tail lights, which is fine by me. I got them for my own joy not others. If people like them, great, if not, no worries. I have seen some Accords with horrendous aftermarket tail lights...there are some where the lights extend out and look like complete crap. I sorta wish the black portion was more of a dark green, like the color of the car and didn't have some of the chrome, but that's just taking custom to another level.

I got the cold air intake installed today, a pain to get the stock piece out. I had to take out the front bumper and part of the fender. I'll have pictures later. I'll admit, it is a bit more on the ricer side because it's louder once the VTEC kicks in and if I'm accelerating fast, but it sounds nice. Other than that you can't really notice it with normal driving and for $35 bucks hopefully I see a difference with better gas mileage.

I was going to buy an HID conversion kit, but I found out the projector lights I got are not compatible with them. In a way that's good, because it's money I can save and I can get the headlights in already. I was going to wait till I got the HID's. I'll probably install the lights on Friday and my car will FINALLY get a wash after maybe 4 months. I was going to wait till my car was completely finished and get a full blown detail, but I'll stick to a regular wash by myself for the meantime.
 

donpisto

Well-Known Member
Joined
May 18, 2008
Posts
107
Reaction score
0
Location
Los Angeles, CA
I mixed some sludge activator with the gallon of spectrum and wow, that stuff is thick! I put on some gloves and spread a nice and thick layer on the front wheel wells, along with a layer of spectrum before that, another thick layer of sludge on the top and bottom of the rear deck, and a thick layer on the trunk lid. Tomorrow I will add a layer of sludge to the rear wheel wells and if I have any leftover I will do the trunk bottom of the rear deck for sure and either the hood or the trunk lid again.

I think the trunk lid is fine though, it has a layer of Damplifier, 5 layers of Spectrum and one layer of sludge. I also put a layer of damplifier, 2 layers of spectrum, and 1 layer of sludge on the firewall on the engine side, but since there is so little room to work with I was only able to do pretty much the top portion. I would really need for everything to come out, well mainly the engine, in order to do the entire firewall as I would like. That would kill a great amount of road noise.

I also installed the projector lights and they are brighter and the beams are wider than the stock. I still have to connect the wires for the little circles that light up. I do need help with that though. If anyone knows how I can get the positive/power wire connected so that it turns on when the headlights turn on I'd really appreciate it. I will have some pictures up of what I did yesterday and what I will do tomorrow up around noon or so. I plan to wash my car so it won't have layers dirt either :)
 

donpisto

Well-Known Member
Joined
May 18, 2008
Posts
107
Reaction score
0
Location
Los Angeles, CA
Haven't posted in a while, but I've done little work here and there. I put the splash guard back onto the hood, installed the head lights and cold air intake, and deadened a bit more.

Pics of headlights installed:

IMG_1716.jpg


IMG_1717.jpg


IMG_1728.jpg


IMG_1726.jpg


IMG_1722.jpg


IMG_1723.jpg


IMG_1725.jpg


I put a layer of damplifier, 2 layers of spectrum, and 1 layer of sludge on the firewall (engine side), but unfortunately I couldn't do the entire firewall, just the top portion which probably covers about 10-15% of the entire firewall. I would need to pull out the engine in order to do the rest and I'm not wanting to do that at all. It's hard to see the difference between the before and after pictures, but nonetheless, here they are.

IMG_1704.jpg


IMG_1712.jpg
 

donpisto

Well-Known Member
Joined
May 18, 2008
Posts
107
Reaction score
0
Location
Los Angeles, CA
I mixed up the sludge activator with the spectrum and man, that stuff is THICK! I did some thick layers on all the surfaces I covered and did so by putting on a latex glove and spreading with my hand. Much easier and quicker than using a putty knife. I did the front wheel wells with 1 layer, though may have been two, I can't quite remember. Also when I had done the wheel wells before with spectrum, I did the front quarter panels as well. I did the front quarter panels with a layer of sludge too. I actually noticed a difference once doing the layer of sludge on the quarter panels.

Sludge on the wheel wells

IMG_1708.jpg


The top of the rear deck with one layer

IMG_1709.jpg


The bottom of the rear deck with two layers

IMG_1711.jpg


The trunk lid with one layer

IMG_1710.jpg


I still have some left, so I'll probably do the bottom of the rear deck again or the trunk lid...i'll do both if I have enough though.

I also put deadener over some of the holes in the rear doors. I didn't bother with sheet metal because I didn't feel like it and I still have some deadener left over, about 7 sq. ft. I'll have to figure out where that will go.

I have not worked on the baffles yet either...well, I actually was yesterday until my cousin brought over his sister's 6 month old. She was sitting in my car playing video games, rather my cousin was playing, she was pretend playing, and I didn't want to do any wood cutting while she was around. I did cut parts of the door panel where the mids might be be touching the panel. If it doesn't rain today I will work on the baffles.
 

donpisto

Well-Known Member
Joined
May 18, 2008
Posts
107
Reaction score
0
Location
Los Angeles, CA
Just got done working on the baffles and it was going quite well till I had actually cut them out and did a test fit. Everything went downhill from there. With two baffles, a total of 1", the mid had perfect clearance depth-wise. Unfortunately, the basket was still hitting the door so I figured I'd give it a shot and add another 0.5" baffle. The mid went in perfectly, no issues.

Just by looking at it, it looked like it extended quite a bit. I put the door panel on and it doesn't come near fitting on properly. I cut part of the door panel again, and even accidentally cut part of the exterior of the door panel, :(, and it still would not fit. I have about 1" of a gap to fill.

My only option that I can think of is to cut a good chunk out of the dark brown (lower) portion of the door panel around where the baffle would go. I know the baffles are in squares in the pictures, but even if I cut them in the shape so it would fit inside the huge hole (where the speaker grill used to be) it may not work because of the mounting holes. As I'm typing this, I'm thinking that it might be possible to actually do that, but I'll have to double check some other day.

I actually do have a second option, which is to have a shop or maybe even another DIY'er who can make this all look real nice. If anyone knows they can do this type of work and make it look real good, let me know.

Also, if anyone has any ideas, feel free to blurt it out. I'm open to suggestions, because there may be things I'm not thinking of that could help me a great a mount.

Anyhow, on with the pictures. Here's a picture of what the mid WOULD look like if everything fit properly.

IMG_1765.jpg


Side view of the gap

IMG_1766.jpg


Top view of the gap

IMG_1768.jpg


Side shot

IMG_1773.jpg


Where I screwed up like an idiot and cut through the door panel

IMG_1774.jpg


Baffles with the door panel off

IMG_1775.jpg


IMG_1776.jpg


IMG_1777.jpg
 

donpisto

Well-Known Member
Joined
May 18, 2008
Posts
107
Reaction score
0
Location
Los Angeles, CA
Removing a baffle will not work since the basket will be hitting the door. I've cut the panel quite a bit and if I cut any more, it might look odd. Shortly after I posted this, WattsLOk187 called me up and we had a good chat. Gave some great ideas and I'm going to take some of them. He mentioned moving the mid closer to the middle of the door. Only way doing this is by moving the mid up and back, so some cutting of the door will be necessary. I really never wanted to go that route but it seems the most logical.

Also, I'll either have the bottom portion fiberglassed or cover it with cloth. The bottom piece is actually two pieces. The pouch is a separate piece so it can come off. I'll just use grill cloth. I probably won't start this out till next week or so. I gotta come up with an exact plan and follow it. Hopefully all goes well. In the meantime there is not much to do, except for putting deadener on the back of my tail lights, which I completely forgot. I have some Damplifier and sludge leftover, so that should take care of that. I'll probably re-do my big 3 as well.
 

donpisto

Well-Known Member
Joined
May 18, 2008
Posts
107
Reaction score
0
Location
Los Angeles, CA
I got around to cutting the doors. I only did the driver door since I want to make sure everything works just fine and then I'll move to the passenger door. I accidentally messed up by cutting the size of the speaker instead of the cutout diameter. It's not too big of a deal, just need to make the baffle a little bigger and cut more of the door panel, maybe by half an inch each side.

With the door panel I placed the thin foam gasket that came with the mids where I would want the mid to be so that it would fit well in the area I need it to be.

IMG_1785.jpg


IMG_1786.jpg


Took the door panel off and marked with a Sharpie where I need to cut.

IMG_1788.jpg


IMG_1789.jpg


Did the actual cut with a jigsaw. It was very easy and I found it to cut in a circle by itself somehow. I was hardly turning the jigsaw itself :confused: I started using some sheet metal cutters at first but felt it would take too long and the jigsaw was a good idea. The little piece in the upper left corner sticking out has been removed, just not pictured.

IMG_1790.jpg


IMG_1792.jpg


Put the door panel back on to see if I needed to make any adjustments, but it seems it turned out quite well.

IMG_1793.jpg


IMG_1794.jpg
 

donpisto

Well-Known Member
Joined
May 18, 2008
Posts
107
Reaction score
0
Location
Los Angeles, CA
Got my Sharpie out again and traced where the door panel was so that I know how to cut my baffles without them touching the door panel itself.

IMG_1795.jpg


IMG_1797.jpg


Reason I did that is because I will be using 1" baffles which will more than likely work. If not, 1.25" baffles will definitely work. As you can see I have a little under 3/4" of space from the door to the door panel, so anything larger than that, the baffles will not allow the door to remain in place via the clips.

IMG_1807.jpg


Tested to see how the mid would with the door panel on. I inverted it to see better and get a better idea since as I mentioned, if the baffles are in place, the door panel will be sticking out. Everything seems to be going well.

IMG_1798.jpg


IMG_1799.jpg


Tomorrow I will be cutting the door panel a little and start on the baffles. I plan to trace the stock speaker grill so I have a general idea what the maximum size and shape the baffle should be within.
 

donpisto

Well-Known Member
Joined
May 18, 2008
Posts
107
Reaction score
0
Location
Los Angeles, CA
Decided I'll probably even mount the tweeters in the A pillars. Gonna make them flush as well. Once doing that I will cover the pillars with grill cloth for a stock lock and nobody will even know I have tweeters :)

Didn't do any baffle work today since I was waiting on a call for something, and won't be able to tomorrow. Might be able to on Thursday or Friday. I did check some things out though. My stock locations for the tweeters are up on the dash by the windshield. I was getting reflections off glass to the dash and it messed with the imaging so I got a dash mat. I am going to end up doing the tweeters in the A Pillars.

They were quite easy to take off (thank goodness). Here is a picture of it nearly taken off.

IMG_1814.jpg


A shot of where the wires will come, which will be on the left side by the A Pillar. You can also see where the tweeters were originally mounted. I will either use my 2nd dash mat since it doesn't have the openings for tweeters or I will cover them with speaker grill cloth I just bought.

IMG_1815.jpg


Reverse side of the A pillar panel and where the tweeter will be mounted.

IMG_1817.jpg


I have plenty of room thanks to the short mounting depth of the Zapco tweeters. It doesn't look like there is in the pictures, but visible to the human eye there is plenty of room.

IMG_1818.jpg


IMG_1821.jpg


IMG_1822.jpg


IMG_1823.jpg


General location of where the tweeter will go.

IMG_1824.jpg


IMG_1825.jpg


IMG_1826.jpg
 

Latest posts

Back
Top